There are a few different massage treatments which you can incorporate into your recovery protocol. While it’s generally not required to do massage treatments during the beginning stages of bodybuilding or strength sports, it certainly is beneficial once you’ve developed some scar tissue and overuse injuries.
Coach Steve does weekly Deep Tissue Massage Therapy (DTMT) at home with a certified DTM therapist to stay functional and prevent scar tissue buildup. A skilled therapist can figure out your problematic areas within a single session, although it might require several sessions to complete work through the scar tissue. I took Coach Steve about 20 sessions to minimize scar tissue buildup from injections in glutes, upper quads & lats, about 30 sessions to break apart adhesions from scar tissue around micro-injuries, and around 50 sessions to improve range of motion and flexibility.
It’s a lengthy and expensive process that’s often incredibly painful to endure for an hour or two per session. After a few sessions, most athletes already notice improved range of motion and recovery due to better bloodflow to previously bound up areas, once you’ve got 50 sessions in, you should feel very limber and mobile while training with insane weights!
Deep Tissue Massage Therapy (DTMT)
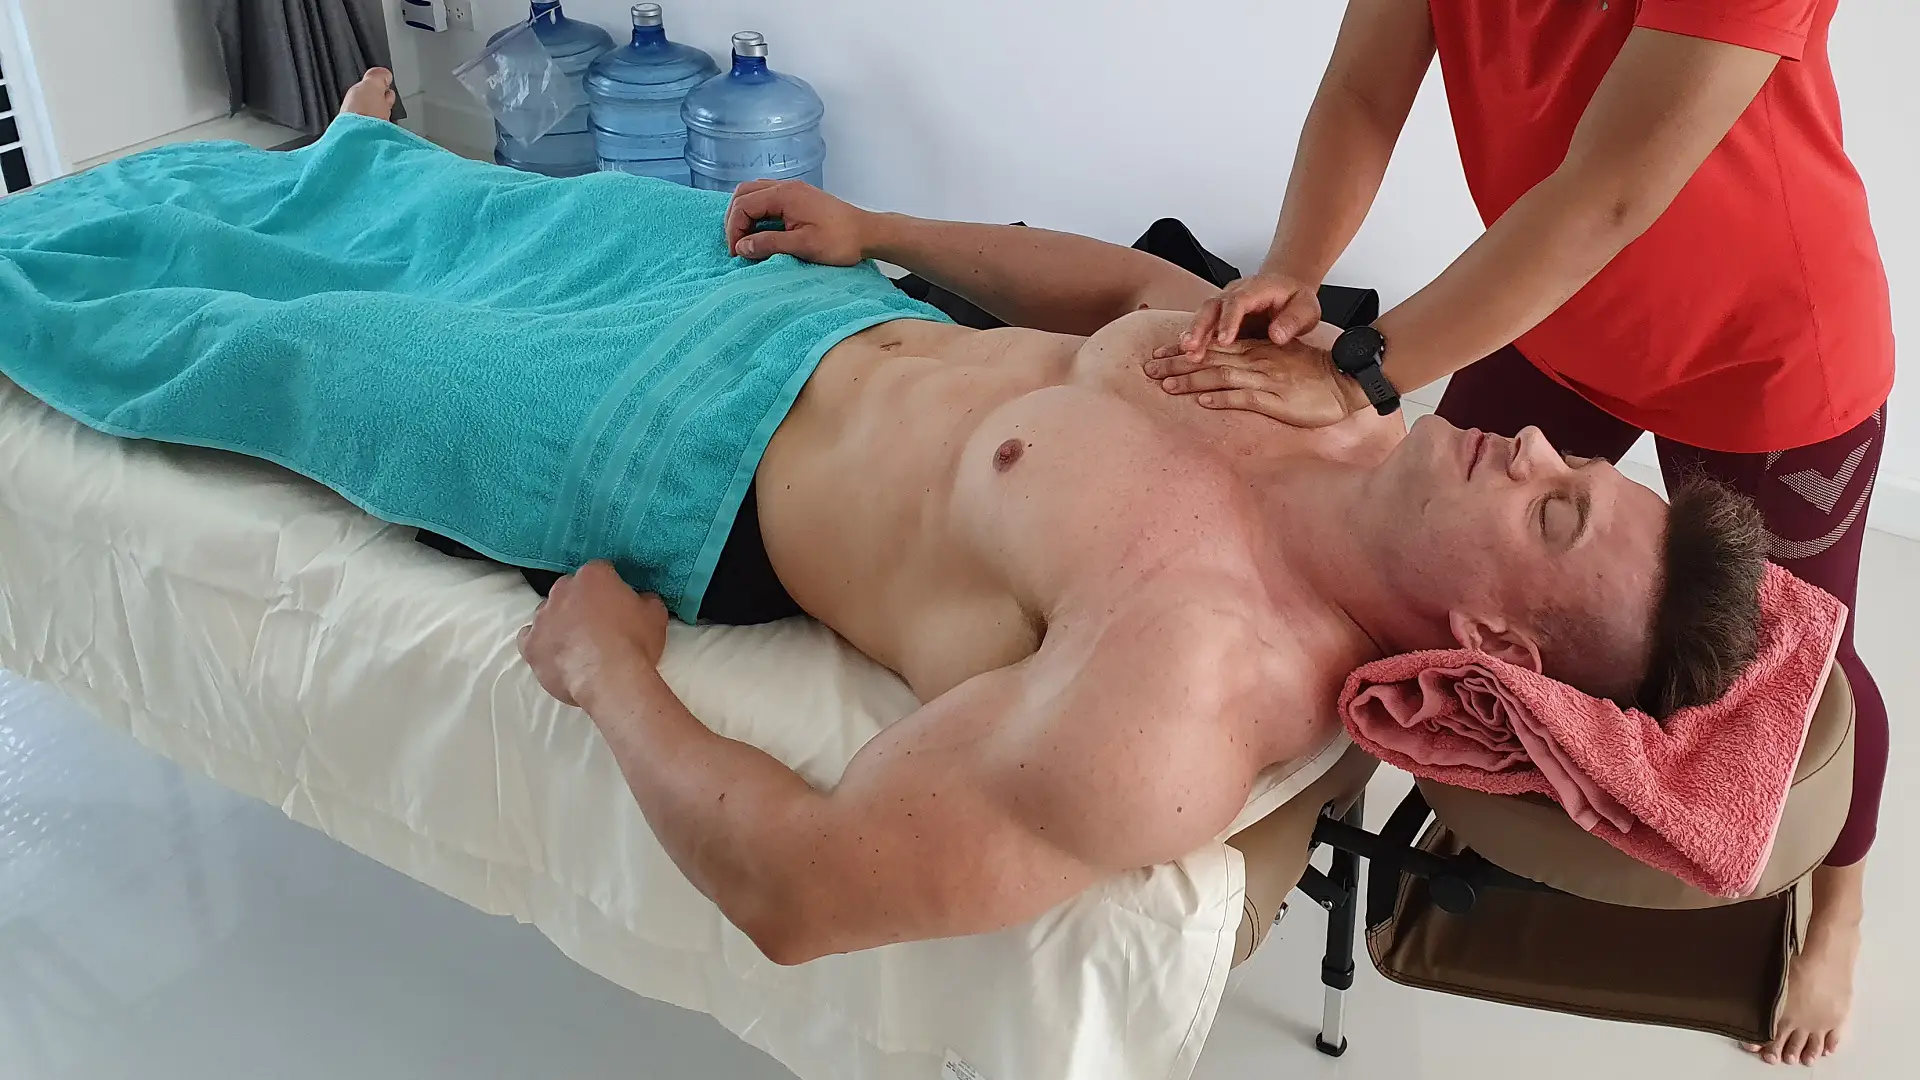
Deep Tissue Massage is a type of massage therapy that focuses on realigning deeper layers of muscles & connective tissue. It is especially helpful for chronically tense & overused areas, which can occur anywhere in the body depending on which training regiment the bodybuilder, strength athlete, or fitness enthusiast follows.
Some of the same massage strokes are used as traditional massage therapy, but the movement is slower, and the pressure is heavier, allowing for a deeper treatment of the muscles & connective tissues, concentrating on areas of tension, adhesions & pain.
When there is chronic muscle tension or injury, there are usually adhesions (bands of painful & rigid tissue) in skeletal muscles, tendons or ligaments, or a combination thereof. Adhesions can block circulation and cause pain, limited movement, and inflammation. Deep Tissue Massage Therapy works by physically breaking down these adhesions to improve blood circulation & recovery from workouts, relieve pain and restore normal movement, or at least, increase range of motion.
Depending on the type of adhesion or tension, DTMT can be moderate to incredibly painful at times. It’s essential to communicate with your massage therapist during the DTMT session to assess how much pressure can be applied. The therapist can also prepare you for the pain to come when treating areas with many adhesions or scar tissue. Over time, these adhesions & scar tissue will slowly break apart, increasing mobility and allowing the therapist to apply even more force to reach deeper lying tissues during the DTMT sessions. Eventually, treatments will almost become pain-free as all adhesions have been massaged out, and the scar tissue has been broken apart to the point therapy doesn’t hurt anymore. However, this might take months, so you’ll have to suffer through a few painful sessions before it gets better!
Massage therapists may use Fingertips, Knuckles, Hands, Elbows & Forearms during the Deep Tissue Massage Therapy session. You may be asked to breathe deeply and slowly as the massage therapist works on certain tense areas. It is important to drink plenty of water during & after the DTMT session to flush metabolic waste products & toxins from the tissues and body.
NOTE 1: If you take injectable steroids, make sure you inform your massage therapist about the location of injection as they might mistake it for scar tissue, which will lead to a very unpleasant feeling when the therapist attempts to break it apart with force.
NOTE 2: Do not eat a meal within 1 hour of starting your DTMT session as you’ll typically lay on your stomach at the beginning of the session, allowing the therapist to work on your Back. Having undigested food in your stomach, while the therapist is applying force to work through adhesions in your Back, Neck & Triceps, will not be a pleasant experience!
Active Release Technique (ART)
Active Release Technique (ART) treats your body’s soft tissue by combining manipulation with movement. ART focuses on identifying, isolating & targeting the affected areas to break up adhesions & scar tissue. This improves blood circulation and promotes the healing of injuries. ART is recommended on previously injured areas that required surgery for re-attachment, like a (partially) torn Pectoral muscle or Bicep tendon.
Similar to DTMT, ART can be used to treat pain & symptoms caused by injury or damage to the Fascia (the fibrous connective tissue that protects & supports muscles and organs), Skeletal Muscle, Tendons & Ligaments. The therapist might use Fingertips, Knuckles, Hands, Elbows & Forearms to improve mobility and break up scar tissue.
Where Active Release Therapy differs from Deep Tissue Massage Therapy is by applying movement against resistance to break up adhesions & scar tissue. You could almost consider ART an invasive treatment (a medical procedure that enters the body), while DTMT is mostly non-invasive as it rarely involves movement of the patient.
The therapist will first identify & assess scar tissue locations, followed by several Active Release Techniques to isolate & target the area. Manipulating it with pressure & movement of involved Muscles, Tendons & Ligaments to break up the scar tissue. Compared to DTMT, this way of therapy is considered to be a lot more painful, as ART involves very precise pressure & movements, especially in injured areas where large amounts of scar tissues have formed during the healing process.
ART can be considered after the patient has broken up most of the adhesions with DTMT, but there’s some lingering scar tissue present in certain areas, which DTMT can’t improve on its own. If the patient has a high pain tolerance, they might resolve most of their issues in 1 or 2 sessions. Successful treatment requires an experienced ART provider as well as good communication from the patient during the art session. ART should only be performed by a certified provider. You can find Certified ART Providers in your area on the ART website:
Graston Technique is a patented technique similar to ART, but does not involve hands-on massage therapy. Graston also targets adhesions & improves blood flow but uses handheld instruments to provide tissue mobilization with a specialized form of massage or scraping of the tissue. The Graston Techniques are only practiced by licensed Chiropractors, Osteopathic Physicians, Physical Therapists & Massage Therapists.
Graston Technique utilizes 6 tools that are made of stainless steel and concave & convex-shaped. They have rounded edges and are not sharp. The instruments are used to detect areas of injured fibrotic tissue, adhesions & scar tissue and are used to break up these bound areas with pressure.
Using a cross-friction massage, which involves brushing & rubbing against the grain of the scar tissue, the therapist re-introduces small amounts of trauma to the affected area. This process causes temporary inflammation in the area in order to improve blood flow & circulation.
Graston Technique can be considered after the patient has resolved most of their adhesions & scar tissue with DTMT & ART methods, and most of their range of motion has been returned. Since the Graston Technique is more precise compared to ART, it is used to treat areas that ART can’t improve or as maintenance by treating minor adhesions specifically as they occur on the athlete. Graston Technique should only be performed by a certified provider. You can find Certified Graston Technique Providers in your area on the Graston Technique website:
The easiest way to give yourself massage treatment in an attempt to break up adhesions & scar tissue is by using a Lacrosse Ball. Simply place the ball on the floor and rest the afflicted area on it, gently rolling around while applying more force with gravity over time. This allows the adhesions or scar tissue to slowly dissipate as you’re rolling & massaging with increased force until you’re almost completely supporting your own body weight on the Lacrosse Ball. This form of massage treatment is also excruciating; hence most bodybuilders, strength athletes, or athletes prefer to use a licensed therapist instead.
NOTE: This method isn’t very delicate or precise, but a lot more cost-effective compared to hiring a therapist to perform Deep Tissue Massage Therapy, Active Release, or Graston Technique on you.
In this article, we’ll discuss a few MUST HAVE Electronic Devices that every bodybuilder, strength athlete, or fitness enthusiast should have at home to monitor their health, whether on or off cycle. We can keep track of our health using these devices daily, as its financially impossible to go to do blood work every week to see the minor fluctuations in health markers. Some of the testing equipment that the hospitals or clinics use has been standardized and is available in small & portable devices that can be bought online or at your local pharmacy for a small investment. We’ll discuss the most essential devices in this article, how to use them and where you can buy them online!
With regards to improving certain aspects of your health, when one of the discussed devices indicates there’s a problem, make sure you address the potential cause of the problem before resorting to supplements or medications. If you aren’t able to solve the problem this way or need to continue to use specific Performance Enhancing Drugs (PEDs) because your livelihood depends on it. Then you can use specific Over-The-Counter (OTC) supplements to improve particular health markers with this article: Coach Steve’s Year-Round Supplement Stack
Body Weight Scale
A bodyweight scale is the most straightforward device any bodybuilder, strength athlete, or fitness enthusiast can use to track their progress. You step on the scale, and it’ll give you your body weight in Kilograms (Kg) or Pounds (lbs). The easiest way to track fluctuations in your body weight is by writing your weight on the Calendar!
There are several digital body weight scales available that send your weight to an app on your phone by BlueTooth or Wi-Fi. Allowing for a digital readout, in which you can track the trend of your body weight changes with a timeline graph. Higher-end models can also calculate your Body Mass Index (BMI) & Body Fat Percentage.
The most popular multi-functional body weight scale is the Renpho Digital Weight Scale, it can be bought online on most retail websites, including Amazon, E-bay, Ladaza, AliExpress & Shopee.
A Sphygmomanometer or blood pressure meter/monitor is a device used to measure Systolic & Diastolic blood pressure; most models measure heart rate as well. Blood pressure monitors are composed of an inflatable cuff, which collapses and then releases the artery within the cuff in a controlled manner. Manual Sphygmomanometers use Mercury or use a mechanical Manometer to measure the pressure changes. Digital meters employ Oscillometric measurements and electronic calculations rather than auscultation.
Measurements with both manual & mechanical Sphygmomanometers are always in conjunction with a means to determine at what pressure blood flow is just starting and at what pressure it is unimpeded. This determines the readings of Systolic & Diastolic blood pressure.
Bodybuilders, strength athletes, or fitness enthusiasts will have difficulty getting an accurate reading using a blood pressure monitor that uses an arm cuff. Blood pressure monitors aren’t calibrated for muscular arms over 46cm / 18inch. Muscular people should use a blood pressure monitor that uses a wrist cuff, which either slides over your hand or secures tightly with velcro.
Take your readings while sitting down for at least 5 minutes to let your heart rate & blood pressure return to baseline. Also, make sure you leave a 1-2cm / 0.5-1inch space between the wrist cuff and your hand for an accurate reading. Most blood pressure monitors start working after you turn them on and will display your heart rate and Systolic & Diastolic blood pressure within 2-3 minutes of use.
Below are the ranges for different blood pressure categories determined by the American Heart Association: • Normal: Systolic below 120mmHg & Diastolic below 80mmHg • Elevated: Systolic 120-129mmHg & Diastolic below 80mmHg • High Blood Pressure (Stage 1): Systolic 130-139mmHg & Diastolic 80-89mmHg • High Blood Pressure (Stage 2): Systolic over 140mmHg & Diastolic over 90mmHg • Hypertensive Crisis: Systolic over 180mmHg & Diastolic over 120mmHg NOTE: In cases of Hypertensive Crisis, the person requires immediate medical attention!
Blood pressure management encompasses many aspects of bodybuilding, strength sports, or general fitness, especially concerning PED usage. The most popular wrist blood pressure monitor is the Omron 7 Series, it can be bought online on most retail websites including; Amazon, E-bay, Ladaza, AliExpress & Shopee.
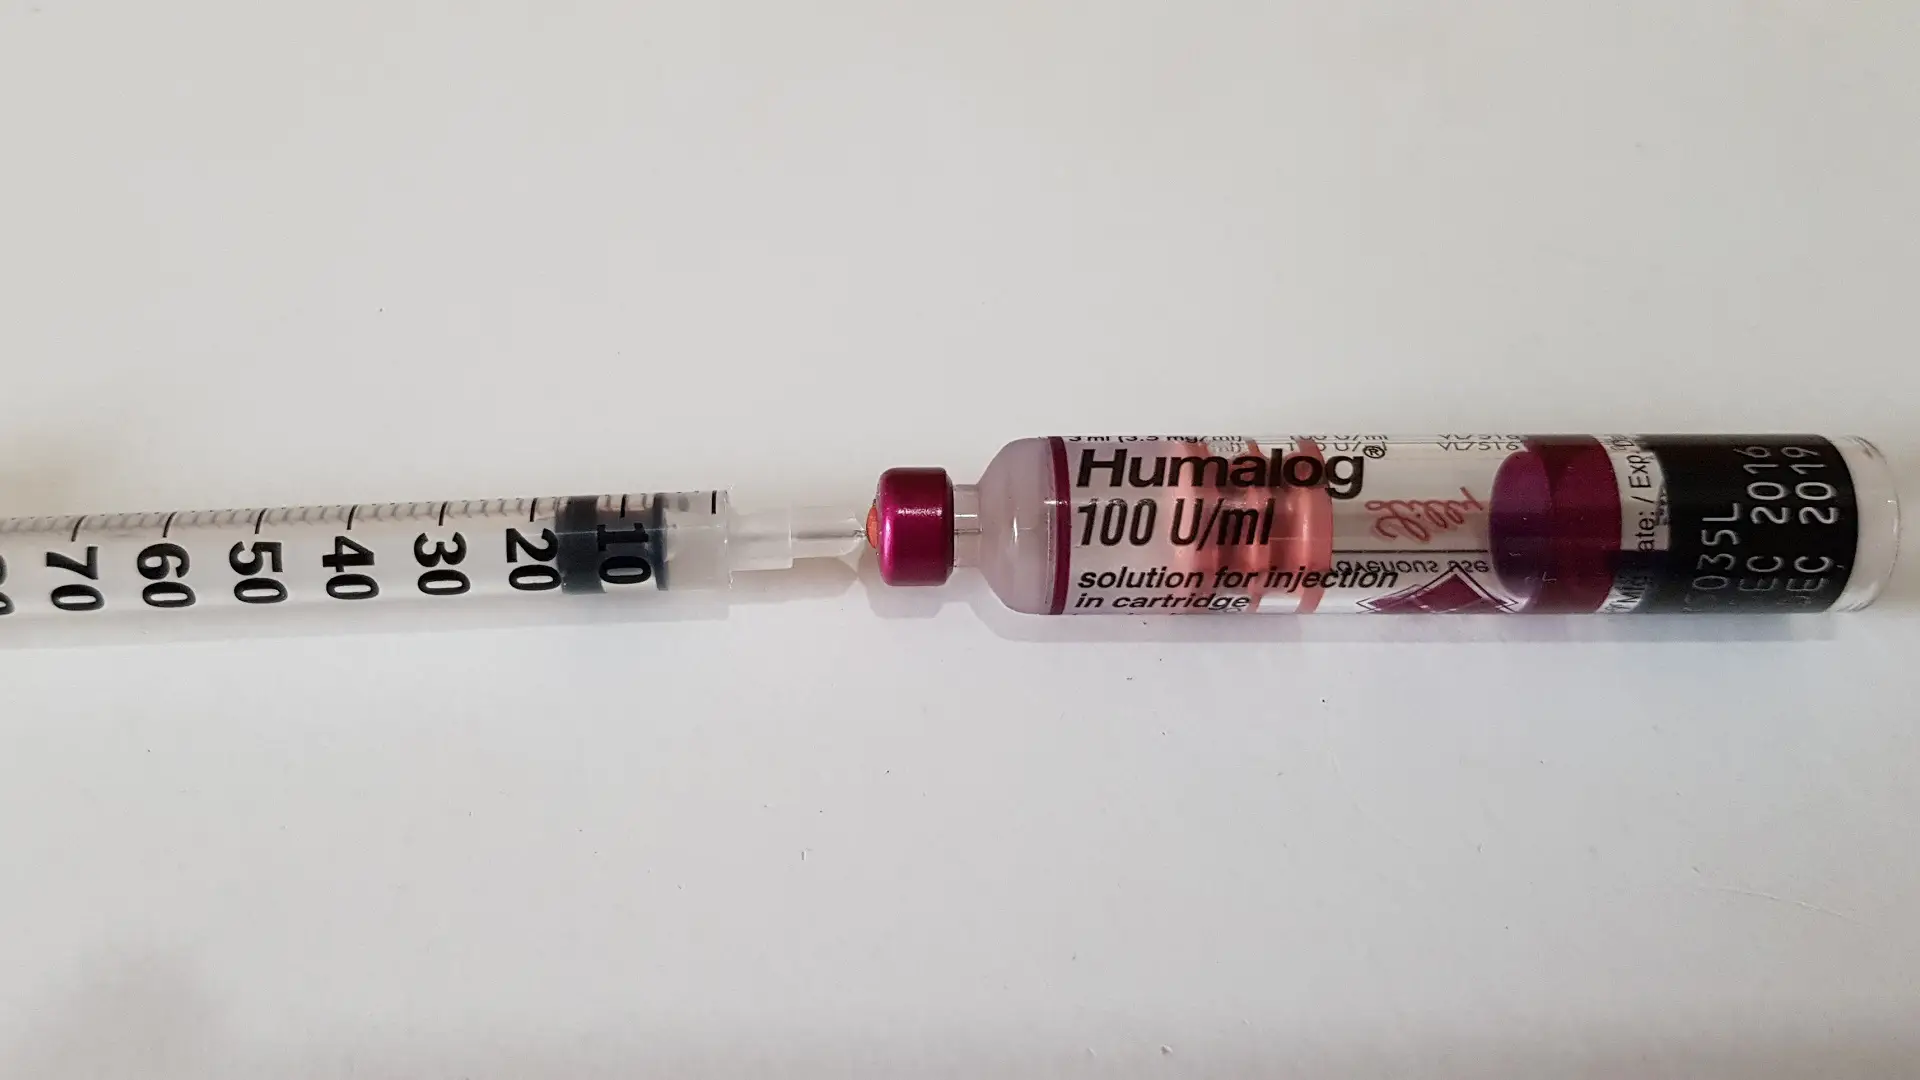
A glucometer is a medical device for determining the approximate concentration of glucose in the blood. This device is commonly used by people who suffer from Type 1 or 2 Diabetes to assess their blood glucose levels. Glucometers are readily used by advanced bodybuilders, strength athletes & fitness enthusiasts to see if they’re losing Insulin sensitivity during the offseason. Either due to high carbohydrate intake, continuous GH use, or by using Growth Hormone Secretagogues like MK-677 or GHRP-6. Daily use of a Glucometer is essential when using fast-acting or long-acting Insulin to assess accurate Insulin dosing.
Below are very general guidelines of when you should take blood glucose readings while using specific forms of Insulin: • Fast-Acting Insulins: after fasted cardio, 2 hours after meals, post-workout • Long-Acting Insulins: upon waking, 2 hours after meals, post-workout, before bed
A glucometer requires a small drop of blood obtained by pricking the skin with a lancet provided with the glucometer kit. Place the sample of blood on a disposable test strip that the meter reads and uses to calculate your blood glucose level. The glucometer displays the level in units of mg/dl or mmol/l.
Below are the ranges for blood glucose ranges, which are considered to be healthy: • Fasting Blood Glucose Level upon Waking: 70-100 mg/dL or 3.9-5.5 mmol/L • Blood Glucose Level 2 hours after Meals: 90–130 mg/dL or 5.0–7.2 mmol/L NOTE 1: Fasting hyperglycemia is diagnosed as a blood glucose level higher than 130 mg/dl or 7.2 mmol/l after fasting (from calories, not water) for at least 8 hours. NOTE 2: Postprandial hyperglycemia is diagnosed as a blood glucose level higher than 180 mg/dl or 9.9 mmol/l, 2 hours after eating a meal containing carbohydrates. Healthy individuals without Diabetes rarely have blood glucose levels over 140 mg/dl after consuming a meal, unless the meal contained a large amount of processed carbohydrates (cereal, popcorn, ice-cream, cake, etc.) NOTE 3: Fasting & postprandial hypoglycemia is diagnosed as a blood glucose level lower than 70 mg/dl or 3.9 mmol/l after fasting (from calories, not water) for at least 8 hours as well as in between meals.
Frequent or ongoing high blood glucose levels can cause damage to the nerves, blood vessels & organs, as well as lead to other severe medical conditions when left untreated. People who develop Type 1 Diabetes are prone to the build-up of ketones in the blood called Keto-Acidosis.
When you notice that your blood glucose levels rise towards the top of the reference range or see readings above the reference range, then it’s time to make some adjustments to your food intake & PED Protocol. Allowing blood glucose levels to return within the reference range again.
Combination glucose & ketone meters are also available on most retail websites. A popular combo meter is the KETO-MOJO, it can be bought online on most retail websites including; Amazon & E-bay.
Ketones (Beta-Hydroxybutyric Acid) or Ketone Bodies are produced in the Liver when Liver glycogen stores and blood glucose levels are low. Low glycemic states allow the Brain to switch from glucose to ketones for energy. Ketones are measured in the blood as well as urine. Before blood & breath testing equipment became available, urine ketone measuring strips were used to indicate if the person was in ketosis or not. Nowadays you’re able to check the ketone concentration in the blood more accurately using specialized electronic devices.
Ketone monitors were developed to check for Diabetic Keto-Acidosis (DKA) in people who have Type 1 Diabetes. Similar to glucose, we want ketones in metabolically active tissue, not as large as concentrations in the blood. Bodybuilders, strength athletes, or fitness enthusiasts can use these ketone devices to check their level of ketosis. Measuring both serum glucose & ketone levels allows you to assess the effectiveness of a ketogenic diet. Ketone monitors are also used to assess how long it takes to get back into ketosis after a refeed with carbohydrates or cheat meal.
Nutritional ketosis begins at serum ketone concentration levels of 0.5 mmol/L, while blood glucose levels are between 65-80mg/dL or 3.6-4.4mmol/L. Nutritional ketosis occurs naturally upon waking before consuming breakfast, as you deplete Liver glycogen & blood glucose levels overnight while in a calorie deficit. Eating a meal with carbohydrates will bring you out of ketosis and switch the energy consumption of the Brain back to glucose.
Individuals who follow a ketogenic diet, restrict carbohydrates to 50-70g per day, and only have direct carb sources post-workout will see their blood ketone levels rise between 1.0-4.5mmol/l depending on the time of day. The protein & fat content of the meals consumed prior determines the number of ketone bodies in the blood. Fat burners are also able to increase ketone bodies.
Fasting for several days can increase blood ketone levels well above 5mmol/L even close to the 6.5-7.5mmol/L range. Blood ketone levels above 8mmol/L are usually only seen in people with Type 1 Diabetes. Who produce too many ketone bodies to compensate for the inability of glucose to reach metabolically active tissue. Symptoms of very high blood ketone levels or Keto-Acidosis (above 8.0mml/L) include; excessive thirst, increased urination, fruity or acidic smell of the breath or bodily fluids as well as cottonmouth.
Combination glucose & ketone meters are also available on most retail websites. A popular combo meter is the KETO-MOJO, it can be bought online on most retail websites including; Amazon & E-bay.
Ketone breath testers are reasonably new technology based on Breathalyzers used by Police Officers to measure alcohol concentrations in the blood. Coach Steve hasn’t had a chance to use a ketone breath tester himself. Several of his clients who follow a ketogenic diet use a ketone breath tester, and they appear to be as accurate as most ketone blood monitors. The most popular ketone breath tester is the Ketoscan Mini Breath Ketone Meter, which can be bought online on Amazon.
To accurately assess your thyroid conversion and metabolic rate, you can check your Basal Body Temperature (BBT) upon waking every day during a contest prep or cutting phase. Ideally, you get adequate Iodine, Selenium, and Vitamin K1, K2 MK4 & K2 MK7 from your diet, or use a weekly refeed to stimulate thyroid conversion. Clenbuterol or Ephedrine, Growth Hormone & Thyroxine (T4), or Triiodothyronine (T3) also help to keep the metabolism elevated continuously.
At one point during a cutting phase or contest prep, you’ll notice that your BBT goes down to around 36 Celsius / 96.8 Fahrenheit upon waking, which indicates reduced thyroid output. Even if you’re consuming adequate micro-nutrients in the diet while using PEDs (besides T3) to keep thyroid conversion functioning normally. Caloric restriction for months on end eventually downregulates your metabolism, reducing energy requirement by lowering thyroid conversion.
Below are several states of the metabolism, based on Basal Body Temperature (BBT) readings upon waking: • 36.5 Celsius / 98 Fahrenheit or below: low BBT; indicates reduced thyroid output & lowered metabolism. If micro-nutrient intake is sufficient while using specific PEDs to increase metabolic rate, then the last option is to introduce T3 at 25mcg per day as a replacement dose for sufficient serum T3 levels. • 37 Celsius / 98.5 Fahrenheit: normal BBT; no indication of reduced metabolism or illness. • 37-37.5 Celsius / 98.5-99.5 Fahrenheit: high normal BBT; at that point, metabolism is high enough to taper T3 out of the PED Protocol. Thyroid-Stimulating Hormone (TSH) should restart thyroid conversion within a few days of complete T3 discontinuation. • 38 Celsius / 100 Fahrenheit or above: indicates fever; body temperature elevates to fight off infection.
The most popular Ear Thermometer is the Thermoscan 7 by Brain, it’s a Thermometer designed for toddlers but is just as useful for adults. It can be bought online on most retail websites including; Amazon, E-bay, Ladaza, AliExpress & Shopee. Although there are many cheaper alternative Ear Thermometers available online. Honestly, any device with a 4.5 Star Rating with over 100 Reviews will do the job.
While massage guns seem to have grown in popularity over the years, they don’t come close to qualified Deep Tissue Massage (DTM) or Active Release Therapy (ART) Therapists. However, they can be beneficial to help break up scar tissue & adhesions and improve blood flow to the tissue. The massage guns can usually be adjusted by changing the oscillation & massage depth and come with several different attachments that can be exchanged to suit different purposes.
Coach Steve would like to emphasize that a qualified Therapist is essential for advanced or competitive bodybuilders, strength athletes, or fitness enthusiasts. Building a good relationship with your Therapists allows them to learn about your body and work through the scar tissue & adhesions that you’ve collected. A massage gun isn’t going to give you the attention you need in troublesome areas, they are basically a bandaid, nothing more!
The most popular massage guns are the Hypervolt Plus by Hyperice and the G3PRO by Theragun. The following retail websites sell the Hypervolt Plus & G3PRO; Ladaza, E-bay or Shopee. It’s a bit more challenging to buy them online as Amazon has their own line of 3rd-Party massage guns, which are much cheaper but not as powerful while making significantly more noise compared to the more popular massage guns.
In this article, I’ll lay out the Entire Supplement Protocol which I follow Year-Round. A Combination of these Supplements gives me the best possible Blood Work while Following my HRT Protocol and during a Full-Blown Steroid Cycle. Although Additional Supplementation might be Required when Blasting with Heavy Androgenic Compounds or Potent SARMs. Personally, I don’t use SARMs and have no Interest in Experimenting with them further. I understand that some Readers still Enjoy using them, that’s why I added SARMs to certain Sections of this Article, as I’ve seen enough Blood Work on Ostarine, Ligandrol, YK-11 & RAD-140 to know their Negative Effects on Lipid Levels & Liver Enzymes!
You can find the iHerb Links for Recommended Supplements at the bottom of each Section. iHerb 5% Discount Code: DTV967 Affiliate Link: https://www.iherb.com/?rcode=DTV967
Gorilla Mind also has several Health Supplements in their Product Catalog, can find the Links for Recommended Supplements at the bottom of each Section. Gorilla Mind 10% Discount Code: VIGOROUS Affiliate Link:https://gorillamind.com/?rfsn=4524549.ebc89f
If you’re planning to use a lot of the Supplements mentioned below, you’re better off using a Supplement or Pill Organizer with Individual Day Planner Boxes, which can be removed and taken with you. Apex MediChest: https://www.iherb.com/pr/Apex-MediChest-Large/27067
Watch or Listen to this Articles YouTube Video
Vitamins & Minerals
Multi-Vitamin (No Added Iron)
Dose: 1 Tablet Multi-Vitamin (No Added Iron) with Breakfast & Dinner (2 Tablets per Day)
There are many Multi-Vitamin Formulations available on the Market, I chose Alive! Multi-Vitamin as it has a very Wide Range of Vitamins, Minerals, Anti-Oxidants and other Beneficial Phyto-Chemicals. Alive! Supplies over 100% of the Daily Recommended Intakes (DRIs) for most of the Vitamins & Minerals in a 3 Tablets per Day Formulation. Only Iron, Fiber, Calcium, Magnesium, Sodium & Potassium are below the DRIs Concentrations, but can easily be Acquired through Nutrition or Mineral-Specific Supplementation.
Alive! also has a 3 Tablets per Day Multi-Vitamin Formulation with Added Iron, in the Form of Ferrous BisGlycinate Chelate, which is Preferred for Women as they Lose a Significant Amount of Iron during their Menstrual Cycle. Men should generally avoid Iron Supplementation unless they’re Deficient, as it might Severely increase Hematocrit & RBC Count when using Primobolan, Boldenone, Anadrol or other Erythrotropic Compounds.
I Generally Recommend 1 Tablet Alive! Multi-Vitamin with Breakfast & Dinner (2 Tablets per Day), as you’ll already get a Significant Amount of Micro-Nutrients from your Diet and the other Supplements mentioned in this Article, Over-Supplementation just makes you waste Money!
Dose: 1 Tablet Vitamin B-100 Complex with Breakfast
The Body uses 8 Types of B-Vitamins in many Metabolic Processes that contribute to Energy Production, Creation of Red Blood Cells, Healthy Skin Cells & Neuronal Health. Below is a List of the 8 B-Vitamins and their Specific Functions in the Body: • Thiamin (Vitamin B1); Glucose Metabolism, Creation of Neuro-Transmitters in the Brain & Nervous System, Production of Fatty Acids, Hormone Synthesis. • Riboflavin (Vitamin B2); Energy Production, Fatty Acid, Medication & Steroid-Hormone Metabolism, Converting Tryptophan into Niacin (Vitamin B3), Converts Vitamin B6 into Coenzyme Pyridoxal 5-Phosphate (P5P). • Niacin (Vitamin B3); Niacin converts into Coenzyme Nicotinamide Adenine Dnucleotide (NAD), which Contributes to 400 Enzymatic Reactions. Niacin also aids in Protein, Carbohydrate & Fat Metabolism for Energy Production within the Cells & Gene Expression of DNA in Cells. • Pantothenic Acid (Vitamin B5); Aids in the Creation of New Coenzymes, Proteins & Fats, while Red Blood Cells utilize Pantothenic Acid for internal Energy Producion & Metabolism. • Pyridoxine (Vitamin B6); Contributes to Amino Acid Metabolism, Immune Function & Brain Development as well as the Breakdown of Carbohydrates & Fats. • Biotin (Vitamin B7); Breakdown of Protein, Carbohydrates & Fats, Communication among Cells, Regulation of DNA Replication, Synthesis & Gene Transcription. • Folate or Folic Acid (Vitamin B9); Essential for DNA Replication, Vitamin & Amino Acid Metabolism as well as Cell Proliferation (Hyper-Plasia). • Cobalamin (Vitamin B12); Creation of New Red Blood Cells, Regulation of DNA Replication & Synthesis, Function of Brain & Central Nervous System as well as Protein & Fat Metabolism.
Although the DRIs for most B Vitamins are already Achieved by Supplementing with 1 Tablet Alive! Multi-Vitamin with Breakfast & Dinner, I noticed that adding another 100mg or 100mcg of each B-Vitamin Significantly increased my Energy Levels throughout the Day. NOTE: A Sustained or Time-Release B-100 Complex Formula with Breakfast increases Energy Levels more Effectively, compared to a B-100 Complex Formula in Rapid-Absorbing Capsules.
Dose: 1 Tablet of 1,000mg Vitamin C Ester-C with each Meal (4-6 Tablets per Day, 4,000-6,000mg Total)
Vitamin C is an Essential Water-Soluble Vitamin with Potent Anti-Oxidant Properties as it draws Free Radicals from the Body. Vitamin C’s Chemical Structure Provides Minor Neuro-Protective Effects, Interacts with the Pancreas & Modulates Cortisol Levels.
In case of the Ketogenic Diet, Vitamin C is used as a Non-Metabolic Place Holder for Carbohydrates. Although Carb Intake is usually still around 30-50g per Day, these Carbs come from Vegetables and/or Nuts, which due to their relatively High Fiber Content as well as low Glycemic Index, appear not to Stimulate the Pathways that Starchy Carbohydrates from Rice, Oatmeal or Potato undertake in the Body. Vitamin C however, does undergo the same Pathways, but it not Bio-Available for Energy Production and Potentiates an Anti-Oxidant Effect instead. As Vitamin C is Structurally very Similar to Glucose (Simple Carbohydrates), it’s Transported through Similar Metabolic Pathways as Regular Glucose.
By Consuming 1,000mg Vitamin C with each Meal, these Processes stay Optimized and Active, even when Carbohydrates are (Severely) Restricted. This makes the Carb-Loading or Refeed Process for 1 or 2 Days per Week, much more Efficient and leads to less Water Retention during the Refeed, as well as the Day after the Refeed with a Surplus of Carbohydrates.
Vitamin C also has Minor Diuretic Effects, since Sodium Intake is usually increased while following a Ketogenic Diet to maintain Muscular Fullness & Hydration. The excess of Sodium is excreted alongside Vitamin C, resulting in Less Sub-Cutaneous (SubQ) Water Retention throughout the Day, without any loss of Muscle Fullness or Performance.
Recommended Dosing is 1,000mg Vitamin C (as Ester-C Calcium Ascorbate) with Citrus Bioflavonoids (Vitamin C Metabolites) per Meal, resulting in a Total of 4,000-6,000mg Vitamin C per Day. The Additional Calcium found in Ester-C Formulations, contributes to many Processes in the Body which require Calcium (Bone Density & Muscular Contractions) and helps to Control the Influx of Vitamin C into the Blood Stream. Ester-C is not a Time Released Formula, which don’t appear to have Special Benefits for Optimizing the Carb-Loading or Refeed Process. The Additional Bioflavonoids are just extra Anti-Oxidants which help to fight off Free Radicals, which are an unwanted Byproduct of High-Intensity Training for Hyper-Trophy.
Vitamin E Gamma-E Complex (Mixed Tocopherols & Tocotrienols)
Dose: 1 Capsule of 200-225iu with Breakfast & Dinner (2 Capsules per Day, 400-450iu Total) while using PEDs, 1 Capsule of 200-225iu with 4 Meals during Post Cycle Therapy (4 Capsules per Day, 450-900iu Total)
Vitamin E is a Group of 8 Fat Soluble Compounds that include 4 Tocopherols & 4 Tocotrienols. All Vitamin E Variants are Fat-Soluble Anti-Oxidants Protecting Cell Membranes from Reactive Oxygen Species.
Adequate Levels of Vitamin E helps to Manage SGPT/ALT & SGOT/AST Liver Enzyme Levels, Contributes to Brain Health through Anti-Oxidant Neuro-Protective Effects & Aids in Cardio-Vascular Lipid Management. Vitamin E also plays in Essential Role in the Hypothalamus-Pituitary-Testes/Adrenals-Axis (HPTA/HPAA), increases Sensitivity to Luteinizing Hormone (LH) & Follicle-Stimulating Hormone (FSH) and Manages Leydig Cell Function & Maintains Healthy Spermatogenesis. NOTE: It is unclear which of the 8 Vitamin E Variants has the most Effect on Lowering Serum SGPT/ALT Liver Enzymes, Contributes to Brain Health or aids in HPTA & Spermatogenesis. You’re probably best off taking around 400-450iu Vitamin E consisting of Mixed Tocopherols combined with Mixed Tocotrienols per Day.
Dose: 1 Capsule of 5,000iu Vitamin D3 with Breakfast while using PEDs, 1 Capsule of 5,000iu Vitamin D3 with Breakfast & Dinner during Post Cycle Therapy (2 Capsules per Day, 10,000iu Total), 3 Capsules of 1,000iu Vitamin D3 with Breakfast when using Vitamin K Complex Supplements that also contain 2,000iu Vitamin D3 (4 Capsules per Day, 5,000iu Total)
Vitamin D3 is an Essential Fat-Soluble Nutrient that the Body can Synthesize in the Skin from Exposure to Sunlight. The Body Produces Vitamin D from Cholesterol, provided there is an Adequate Amount of UV Light from the Sun (UV Index over 3) or Tanning Bed. In order to get Sufficient Amounts, a Person Generally needs 20 Minutes of Full-Body Sun Light Exposure. Vitamin D is also found in Fish, Eggs & Dairy Products, albeit in Moderate Amounts which typically don’t reach the DRI of 600 IU Vitamin D per Day.
Supplemental Vitamin D3 is Associated with a Wide Range of Health Benefits, including; Increased Cognition & Memory, Improved Immune System, Management in Sex-Hormone Levels, Management in Bone Health & Overall Sense of Wellbeing. Supplementation can also reduce the Risks of Cancer, Heart & Cardio-Vascular Disease, Diabetes & Multiple Sclerosis. NOTE 1: It’s almost Impossible to get Adequate amounts of Vitamin D3 from your Diet, you’d either need to Tan Daily or use Supplements. World’s Healthiest Foods lists Salmon, Sardines & Tuna as the Highest Sources of Dietary Vitamin D3, but when I looked at the Nutritional Content of these Foods on SELF Nutrition Data, it appears that their Vitamin D3 Content is Insufficient (50-100 IU Total) to reach the DRI Minimum of 600 IU per Day. You’re better off with a 1,000 IU Vitamin D3 Supplement (or more) or 20 Minutes of Full-Body Sunbathing or Tanning per Day!
Dose: 1 Capsule of 2,230mcg Vitamin K-Complex with Breakfast while Cruising, 1 Capsule of 2,230mcg with Breakfast & Dinner (2 Capsules per Day) while Blasting.
Jarrow Formulas K-Right: 2,000iu Vitamin D3, 500mcg Vitamin K1 (Phytonadione), 1,500mcg Vitamin K2 MK-4 (Menaquinone-4) & 180mcg Vitamin K2 MK-7 (Trans-Menaquinone-7) per Capsule, 2,180 Vitamin K Total Life Extension Super K: 1,500mcg Vitamin K1 (Phytonadione), 1,000mcg Vitamin K2 MK-4 (Menaquinone-4) & 100mcg Vitamin K2 MK-7 (Trans-Menaquinone-7) per Capsule, 2,600 Vitamin K Total
Vitamin K is an Essential Fat-Soluble Vitamin which plays a Key Role in Blood Coagulation. Vitamin K is Predominantly found in Dark Green Leafy Vegetables, including: Kale, Spinach, Mustard Greens, Collard Greens, Beet Greens, Parsley, Broccoli & Brussels Sprouts as well as Matcha Green Tea & Natto (Japanese Fermented Soybeans). These Sources of Vitamin K, also contain Significant Amounts of PyrroloQuinoline Quinone (PQQ). Since Vitamin K2 is a result of Bacterial Fermentation, it can also be found in some Animal Products, including; Milk & Cheese.
Adequate Levels of Vitamin K show support for Healthy Blood Coagulation, while Higher Levels of Vitamin K provide Additional Benefits for the Cardio-Vascular System & Bone Health. There it Contributes to Calcium Transport and Shuttles Calcium from the Blood Stream, into Bone & Muscle Tissue (for improved Muscular Contractions). This reduces Potential for Calcification & Stiffening of the Arteries, which further reduces the Risk of Cardio-Vascular Diseases. Vitamin K may also help to Regulate Insulin Sensitivity, although Research is rather Limited at this Point.
Similar to Vitamin D3, its Difficult to obtain High Amounts of Vitamin K from Dietary Sources alone, more Specifically; Vitamin K1 (Phylloquinone), Vitamin K2 (MK-4 Menaquinone-4) & Vitamin K2 (as Natural MK-7 Menaquinone-7) which contribute to Cardio-Vascular & Bone Health. NOTE: Vitamin K Supplements often Contain Vitamin D3, since both Vitamins contribute to Bone Health and have been shown to reduce Risk of Cardio-Vascular Disease. When Supplementing with 1 or 2 Capsules Jarrow Formulas K-Right per Day, you already get 4,000iu Vitamin D3 alongside 4,360mcg Vitamin K1, K2-MK4 & K2-MK7, plus whatever Vitamin D3 you’re Acquiring through Dietary means or Sunlight Exposure. In this case Additional Vitamin D3 Supplementation might not be Required, unless aiming for 5,000-10,000iu Vitamin D3 per Day!
Dose: 1 Tablet of 200mg Magnesium Glycinate, BisGlycinate or Citrate with each Meal (4-6 Tablets per Day, 800-1,200mg Total)
Magnesium is an Essential Dietary Mineral which is used in over 300 Separate Processes in the Body. Sufficient Intake Contributes to Blood Pressure Management, Insulin Sensitivity & Blood Glucose Management, Relaxation of Neuronal Activity according to the Circadian Rhythm & Relaxation of Muscle Tissue Post-Contraction. Maintaining Healthy Magnesium Levels is also Associated with a Protective Effects against Depression & Attention Deficit Hyperactivity Disorder (ADHD).
The Majority of Magnesium in your Body is bound to Proteins or Stored in your Skeleton. Bones contain about half of the Body’s Magnesium as it’s necessary for the Formation of Bone & Teeth and for normal Nerve & Muscle Function. Many Enzymes in the body depend on Magnesium to Function Properly. Magnesium also plays an Important Role in Metabolism of Calcium and Potassium. The Level of Magnesium absorption depends on how much the Body needs, otherwise Magnesium remains in the Intestinal Tract and acts as a Mild Laxative. NOTE: A simple way to assess how many Milligrams of Magnesium your Body requires is by slowly increasing Supplemental Forms of Magnesium (Glycinate, BisGlycinate or Citrate) until you get loose Stool or Diarrhea. Then you reduce the Dose until you no longer Experience these Side-Effects, that’s the Optimal Amount of Dietary & Supplemental Magnesium you can absorb every Day!
Magnesium is very Beneficial for Healthy Blood Pressure and Intense Hypertrophy Training as it helps to relax the Muscles after a Hard Contraction and aids to lower the Weigh under Tension. A Controlled Negative results in a large portion of the Hypertrophy Signals for Muscle Growth! We end up using a lot of Magnesium this way as the Negative Portion of the Rep should always be performed Slower for Additional Time-Under-Tension (TUT), compared to the Positive Portion, where Calcium is used!
It’s relatively easy to get Adequate Amounts of Magnesium from your Diet as it’s found in most Foods like Fruits, Vegetables, Nuts and Fish, which are all commonly Consumed by Body Builders & Fitness Enthusiasts. In order to supply more Magnesium for a better Controlled Eccentric Contraction, you can use Supplements like Magnesium Citrate or (Bis)Glycinate which are the most Bio-Available Forms of Magnesium. Personally I take 200mg Magnesium Glycinate Tablets with each Meal, up to 1,200mg Supplemental Magnesium per Day, on Top of the 800-1,000mg I get from my Diet already!
Dose: 1 Tablet of 1,000mg NAC with Breakfast & Dinner (2 Tablets per Day, 2,000mg Total)
N-Acetyl Cysteine (NAC) is a Supplement that provides Building Blocks for Glutathione Production in the Liver and other Cells of the Body, it’s also used as Medication to treat Paracetamol (Acetaminophen) Overdose or to loosen Thick Mucus in Individuals with Cystic Fibrosis. It is on the World Health Organization’s (WHO) List of Essential Medicines, which lists the Safest and most Effective Medicines needed in the Bodies Health System.
Glutathione exists in Reduced (GSH) and Oxidized (GSSG) States. The Ratio of Reduced Glutathione to Oxidized Glutathione within Cells is a measure of Cellular Oxidative Stress. In Healthy Cells and Tissue, more than 90% of the Total Glutathione Pool is in the Reduced Form (GSH), with the Remainder in the Oxidized Form (GSSG). An Increased GSSG-to-GSH Ratio is Indicative of Oxidative Stress, by a constant Influx of NAC to create more Reduced Glutathione, this healthy Ratio is Maintained and GSH Protects Cells by Neutralizing Reactive Oxygen Species (converting to GSSG in the Process)
Glutathione is also Employed for the Detoxification of Methyl-Glyoxal & Formaldehyde, both Toxic Metabolites Produced under Oxidative Stress. It also Maintains Exogenous Anti-Oxidants such as Vitamin C & E in their Reduced (Active) States.
Glutathione is Beneficial for Liver Health (as well as Kidney Health) as it Facilitates Metabolism of Xenobiotics by Catalyzing their Conjugation to Lipophilic Xenobiotics, which Facilitates their Excretion or additional Metabolism.
Low Glutathione is commonly observed in Wasting Diseases & Negative Nitrogen Balance, as seen in Cancer, HIV/AIDS, Sepsis, Physical Trauma, Burns, Athletic Overtraining or after Periods of Starvation.
Systemic Bio-Availability of Orally Consumed Glutathione is very low, because the Tri-Peptide Molecule is subject to Disassembly by Protease Enzymes in the Intestinal Tract. As well as an Absence of a Specific Carriers for Glutathione at the level of Cell Membrane. This makes NAC the most Suitable Supplement to increase the Cell’s Concentration of Glutathione as it’s Produced Directly inside the Cell, by using NAC as a Building Block.
NAC is predominantly Metabolized in the Liver, where it’s partially used to create Glutathione as needed by the Body. Taking more NAC then the Recommended Dosage of 1,800-2,000mg per Day has not been shown to increase Glutathione Levels in the Body. NAC by itself has Anti-Inflammatory Effects by Inhibiting & Modulating Cytokine Synthesis. NOTE 1: Alpha Lipoic Acid (ALA) & Glycine can also be used to Synthesize Glutathione within the Cells of the Body! NOTE 2: Glutathione works Synergistically with Vitamin C, E & D3, which also need to be consumed in Adequate Doses according to the DRIs for your Sex & Age Group. These Micro-Nutrients HIGHLY Complement each other!
Dose: 1 Capsule of 500mg OPITAC™ Glutathione (Reduced) with Breakfast & Dinner (2 Capsules per Day, 1,000mg Total)
The Common Consensus it that Oral Glutathione Supplementation isn’t Bio-Available as it breaks down in the Stomach and doesn’t get Absorbed in it’s Active Form. Recently several Studies have been Published which do show that OPITAC™ Oral or Sublingual Glutathione Formulations have Potential for Bio-Availablity. The Exact Formulation behind OPITAC Glutathione is currently unknown. There are a few Liposomal Glutathione Formulations with OPITAC™ Glutathione as well, which appears to increase Bio-Availability further, although I haven’t tried them Personally.
In an Experiment where I replaced 2,000mg NAC with 1,000mg OPITAC™ Glutathione per Day, for a Month, I noticed that my Skin got Lighter, which is a Common Side-Effect of Glutathione Injections. Comparing my Blood Work Results I didn’t notice a Significant Difference between NAC or OPITAC™ Glutathione, which makes me Conclude that both Supplements Contribute to Health in a Similar Fashion. Currently I’m running an Experiment where I Supplement 2,000mg NAC & 1,000mg OPITAC™ Glutathione per Day, but I’ll have to see my Blood Work Results before I draw a Conclusion. I will update this Section once I see some Evidence this Combination is Beneficial, for now either 2,000mg NAC or 1,000mg OPITAC™ Glutathione will Suffice to keep Health Markers in close to the Reference Range while using Moderate Dosages of PEDs!
Dose: 1 Capsule of 500mg TUDCA with Breakfast & Dinner (2 Capsules per Day, 1,000mg Total) while Cruising, 2 Capsules of 500mg TUDCA with Breakfast & Dinner (4 Capsules per Day, 2,000mg Total) while Blasting with Oral Steroids.
TauroUrsoDeoxyCholic Acid (TUDCA) is a Water Soluble Bile Acid, it is the Taurine Conjugated Form of UrsoDeoxyCholic Acid (UDCA). TUDCA has been used in Ancient Asian Pharmacopoeias for its supposed Health Benefits, while UDCA is used in Several Countries for the Treatment of Gallstones & Liver Cirrhosis.
Currently, TUDCA is not Approved by the American Food & Drug Administration, but UDCA is Approved for the treatment of Primary Biliary Cirrhosis (PBC). Ongoing Research has shown that TUDCA has Diminishing Apoptotic Effects (Programmed Cell Death), with potential application in Heart Disease, Parkinson’s Disease & Stroke. TUDCA prevents Apoptosis with its role in the BAX Pathway, which is Trans-Located to the Mitochondria to Release Cytochrome-C, which in turn, Initiates the Cellular Pathway of Programmed Cell Death. TUDCA Prevents BAX from being transported to the Mitochondria.
Body Builders Typically use TUDCA in Combination with Soluble Fiber to reduce Serum Liver Enzymes & Cholesterol Levels as TUDCA increases Bile Acid Flow into the Intestinal Tract, where it can bind to Soluble Fiber for Excretion. While this Effectively lowers Cholesterol Levels, SGOT/AST, SGPT/ALT, Gamma-GT and most other Liver Related Blood Markers, it does not Prevent, Reduce or Protect People from Liver Damage, unless they’re Suffering from Biliary Obstruction or Poor Bile Acid Production. TUDCA reduces the Serum Concentrations of these Health Markers, by promoting Excretion of Bile Acids, which contain Toxins & Metabolic Waste Products.
TUDCA does not Directly Prevent the Damaging Effects of Performance Enhancing Drugs (PEDs), although it does Contribute to Overall Detoxification and prevent Recycling / Reabsorption of Toxins & Metabolic Waste Products into the Blood Stream, minimizing the Harmful Effects of most PEDs. Since many PEDs are also Metabolized by the Liver, this Detoxification Process can be Optimized with TUDCA in order to Remove the Metabolized Hormones & Medication from the Body.
A Welcome Side-Effect of TUDCA is increased Bowel Movements, as the Additional Bile Acid helps to Lubricate Feces & Intestinal Wall, making it easier to pass Stool along. Although this might be Cumbersome when you’re working Office or Manual Labor, it’s a Blessing for Full-Time Body Builders in the Offseason. When you’re consuming 4,000-6,000 Calories per Day from Nutritious Food Sources, Food Volume is rather High and can make you feel Incredibly Full by the End of the Day. TUDCA allows Offseason Body Builders to pass Food along Faster, causing them to Feel a lot less Bloated at the End of the Day.
Depending on the Severity of the Increased Liver Markers, a Dosage of 250-2,000mg TUDCA for 4-8 Weeks is usually enough to bring most Liver Markers back into the Reference Range, as long as Heavy PED use (especially Oral AAS or SARMs) is Discontinued. TUDCA use must be combined with Dietary Fiber Intake of atleast 38g per Day, as well as 5-10g Psyllium Husk Fiber before Bed to promote further Detoxification. NOTE: UDCA isn’t as effective in Increasing Liver Bile Acid Flow as TUDCA as it’s not Conjugated with Taurine. Taking UDCA with Taurine doesn’t cause additional Conjugation and doesn’t increase the Effectiveness of UDCA. TUDCA should always be the Supplement of Choice when aiming to Improve Liver Health & Reduce Serum Liver Enzymes!
Dose: 1 Capsule of 100mg DIM with Breakfast & Dinner (2 Capsules per Day, 200mg Total) while Cruising
Diindolylmethane (DIM) is a Component of Indole-3-carbinol (I3C) found in Broccoli, Kale & Cauliflower. In order to get an Effective Dose of DIM, you’d have to consume Several Hundred Grams of Broccoli, Kale or Cauliflower per Day. Therefore, it’s generally Advised to take DIM in Supplemental Form.
DIM is Classified as a Phyto-Estrogen, which can aid in the Detoxification of other Phyto-Estrogens through the Liver. DIM also has a Potent Effect on Estrogen Metabolism and helps to keep Levels between different Estrogens relatively Balanced, by preventing Drastic increases or decreases in Serum Concentrations of either Estrone (E1), Estradiol (E2) or Estriol (E3).
In Supplemental Amounts, DIM can both Inhibit the Aromatase Enzyme and prevent Conversion of Testosterone into Estradiol (E2), while DIM can also act on more Potent Forms of Estrogen and Convert them into less Potent Forms or Metabolites. This Conversion reduces the overall Effects of Estrogens & Phyto-Estrogens in the Body. However, taking too much DIM at once, might actually cause it to act as a Catalyst for Aromatase Activity and increase Estrogen Synthesis.
General Recommendations for Estrogen Management on a Traditional TRT or HRT Protocol, of while Cruising on Moderate Dosages of Testosterone, 100mg DIM with Breakfast & Dinner is usually enough to keep Serum Estrogen Levels in the Desired Range. However, since Aromatase Activity is increased in Individuals over 15% Body Fat, they might Require Aromatase Inhibitors to Control their Serum Estrogen Levels.
Dose: 1 Capsule of 500mg CDG with Breakfast & Dinner (2 Capsules per Day, 1,000mg Total) while Cruising
Calcium D-Glucarate (CDG) supplies Glucarate for a Detoxification Process where a Glucuronide is attached to a Hydrophobic Molecule to make it more Water Soluble. Many Toxins, Phyto-Estrogens & ALL Sex-Hormones are Hydrophobic Molecules, that’s why the Majority of Sex-Hormones are Bound to Albumin or Sex Hormone-Binding Globulin (SHBG), or Subject to Sulfuration by Steroid Sulfatase (STS), for Transport through the Blood Stream. Glucuronidation Facilitates the Kidneys to remove these Water-Soluble Molecules from the Body, as Kidney Filtration is Highly Dependent on Water & Electrolyte Flow.
The Maximum Detoxifying Effect is only reached at Higher Dosages of 100-200mg CDG per 1kg or 50-100mg CDG per 1lbs of Body Weight. When using CDG in Supplemental Form, we’re not looking to Completely Detox the Body of ALL Toxins & Hydrophobic Sex-Hormones, we’re merely trying to prevent the Recycling of Glucuronide when Serum Concentrations drop below Optimal Levels. When this happens, Toxins & Sex-Hormones aren’t Completely Excreted of by the Kidneys as Glucuronide is Cleaved Off, before the Toxins & Sex-Hormones can reach the Kidneys and be Excreted through Urine. NOTE: If an Excessively High Dose of CDG is used to reduce Toxins & Phyto-Estrogens, Circulation Levels of Neuro-Steroids & Sex-Hormones will also all be reduced for the Duration CDG is Supplemented at Higher Dosages!
Dose: 1 Capsule of 600-800mg EPA & DHA from Fish Oil with each Meal (4-6 Capsules per Day, 2,400-4,800mg EPA & DHA Total)
Jarrow Formulas EPA-DHA Balance: 400mg EPA & 200mg DHA per 1,000mg Capsule (600mg Omega-3 Fatty Acids Total) California Gold Nutrition Omega-800: 480mg EPA, 320mg DHA & 40mg other Omega-3 per 1,000mg Capsule (840mg Omega-3 Fatty Acids Total)
Fish Oil is a Common Term used to refer to 2 Kinds of Omega-3 Fatty Acids; EicosaPentaenoic Acid (EPA) & DocosaHexaenoic Acid (DHA). Both of these Healthy Omega-3 Fatty Acids are found in Fish (Salmon, Herring, Anchovies, Tuna & Sardines) & Phyto-Plankton. The Omega-3 contained in Flax Seeds or Chia Seeds is Alpha-Linolenic Acid (ALA), which requires Conversion into EPA & DHA inside the Body. The Rate of Conversion is Extremely Low, but can be Moderately Improved by reducing Omega-6 & Omega-9 Intake as they Compete for the same Enzymes which Promote ALA’s Conversion into EPA & DHA.
EPA & DHA are involved in Regulating a Wide Range of Biological Processes, including; the Inflammatory Response to Injury & Oxidation (Exercise Induced), Metabolic Signaling Pathways, Brain Function, Insulin Sensitivity & Serum Lipid Management.
Adequate EPA & DHA Intake from Fish or Supplements has shown to reduce Serum Triglyceride & Cholesterol Levels, improve Blood Pressure in Hypertensive Cases, improve Mood & Sense of Wellbeing (through reduction of Neuro-Inflammation), lower Systemic Inflammation, act as Natural Anti-Coagulant, increase Insulin Sensitivity and contribute to Hyper-Plasia as both EPA & DHA are found in High Concentrations in the Cell Membranes.
I prefer to take 1 Capsule of 1,000mg Fish Oil containing 600-800mg EPA & DHA with each Meal to increase it’s Omega-3 Content and improve Insulin Sensitivity throughout the Day. NOTE 1: Many Fish Oil Supplements may contain Harmful Lipid Peroxides (Oxidized Fats that act as Free-Radicals and can Damage Cells). These Peroxides make the Supplement go “Rancid” The easiest way to assess if your Fish Oil has gone Rancid is by opening the Gel Capsule and Smelling & Fasting it’s Content. NOTE 2: Fish Oil Supplements come in many different Concentrations & Potencies, only buy Supplements which is over 50% EPA & DHA (most are only 30% EPA & DHA). Pharmaceutical Grade Fish Oil that’s approved for Clinical Settings has been Tested for Peroxides, Heavy Metals and other Contaminents & Toxins, these Formulations usually contain over 60% EPA & DHA!
Krill Oil is derived from Krill, which is a Type of Crustaceans that Predominantly Feeds on Phyto-Plankton & Algae. This supplies the Majority of their Omega-3 Content. Krill contains the same 2 Fatty Acids as Fish Oil; EicosaPentaenoic Acid (EPA) & DocosaHexaenoic Acid (DHA). However, a large Portion of the EPA & DHA in Krill is in the Form of a Phospholipid, with a Phosphate Group on the End of the Fatty Acid. This results in Higher Bio-Availability of Krill Oil compared to Fish Oil, resulting in similar Beneficial Effects Associated with Omega-3 Supplementation, albeit at much Lower Dosages when using Krill Oil.
Astaxanthin is a Pink-Red Pigment & Keto-Carotenoid found in various Algae, Animals who feed on the Algae, such as Salmon, Red Trout, Red Sea Bream, Flamingos & Crustaceans (including Shrimp, Crab, Lobster AND Krill). When the Predominant Food Source of Animals like Krill or Flamingos is Algae, Astaxanthin causes Pink-Red Pigmentation of the Shell, Skin & Feathers. Although Astaxanthin is Chemically similar to Beta-Carotene, it Provides Different Health Benefits at much Lower Amounts.
Krill Oil Supplements with Astaxanthin from are known to have Additional Heart Health Protective Effects due to a Cascade of Benefits, including: reduced Systemic Inflammation Levels through Anti-Inflammatory Properties, reduced Oxidative Stress through Anti-Oxidant Properties, improved Serum Lipid Management, reduced Perception of Stress as well as increased Cognitive Function, Overall Sense of Wellbeing & General Anti-Aging.
Krill Oil Supplementation on top of Fish Oil Supplementation appears to be more Beneficial over 30 Years of Age when the Body reduces Synthesis of EPA & DHA and Benefits from the Anti-Aging Properties of Phospholipids with Astaxanthin. Most of the Benefits are seen at Dosages between 1,000-3,000mg Krill Oil per Day, when using Fish Oil with each Meal, 2,000mg Krill Oil per Day while Blasting (to reduce Oxidative Stress) appears to be Sufficient. People over 50 Years of Age can Supplement with Krill Oil Daily, regardless of the Amount of PEDs they’re using.
Dose: 2 Capsules of 1,300mg Evening Primrose Oil or 1,000mg Black Currant oil with Breakfast & Dinner (2 Capsules per Day, 2,000-2,600mg Total for 240-280mg Gamma Linolenic Acid) while Blasting
Now Foods Super Evening Primrose Oil: 120mg GLA per 1,300mg Capsule Now Foods Black Currant Oil: 140mg GLA & 104mg ALA per 1,000mg Capsule
Evening Primrose Oil (EPO) is derived from the Seeds of the Evening Primrose Plant, which is Native to North America. Black Currant Oil (GCO) is derived from the Seeds of the Black Currant Plant’s Berries, which is Native to Central & Northern Europe and Northern Asia. Both EPO & GSO are Concentrated Sources of Gamma Linolenic Acid (GLA), an Omega-6 Fatty Acid found in Plant Sources.
GLA is also found in Varying Amounts in Edible Hemp Seeds, Oats, Barley & Spirulina. Genetically Modified Safflower Oil contains around 40% GLA, Borage Oil contains 20% GLA, Evening Primrose Oil Supplements range from 8-10% GLA & Black-Currant Oil contains 15-20%.
The Human Body Produces Sufficient Amount of GLA from Linoleic Acid (LA), which differs from Alpha-Linoleic Acid (ALA) found in Flaxseeds, Chia Seeds & Walnuts. Linoleic Acid is mostly found in Meat and some Vegetable Oils, which Body Builders & Fitness Enthusiasts tend to avoid!
Although Direct Supplementation of GLA is generally not Required, it has been shown to Promote Several Health Benefits for Body Builders & Fitness Enthusiasts, including: reduced Acne Formation, improved Overall Skin Health, reduced High Blood Pressure, contributes to Heart & Cardio-Vascular Health. These Effects are seen at Low Dosages of 240-280mg GLA per Day while Cruising or Blasting, on top of the GLA you’re Acquiring through Dietary means. NOTE 1: Both Evening Primrose Oil & Black-Currant Oil have Minor Anti-Coagulant Properties and can reduce Blood Clotting when combines with Anti-Platelet or Anti-Clotting Medications. Overuse of EPO or GCO with these Medications might increase the Risks & Complications of Bleeding. NOTE 2: GLA can Cascade into Arachidonic Acid, which has shown to be Beneficial for Muscle Growth due to its Pro-Inflammatory Effects in Muscle Tissue Post-Workout.
Dose: 1 Capsule of 100mg Kaneka Ubiquinol CoQ10 with Breakfast & Dinner (2 Capsules per Day, 200mg Total) while Cruising, another 2-3 Capsules of 100mg Kaneka Ubiquinol CoQ10 1 Hour Pre-Workout while Blasting (4-5 Capsules per Day, 400-500mg Total)
Coenzyme Q10 (CoQ10) is a Molecule Produced in the Body that Aids Mitochondria during Energy Production and is also part of the Endogenous Anti-Oxidant System.
Ubiquinol is CoQ10 that has been Converted for use in the Cellular Energy Production Process. It’s Directly Associated with over 95% of the Body’s Cellular Energy Production. In Supplemental Form, Ubiquinol also helps to Protect the Cells from Oxidative Stress, which can cause Damage to Proteins, Lipids & DNA.
Ubiquinol works by Transferring Electrons in the Proton-Pump Process that Mitochondria use to Produce Energy within the Cells of the Body, especially in the Heart which Requires a Significant Amounts of Cellular Energy to Function Properly! Ubiquinol is Critical in the Production of ATP, the body’s Primary Fuel Source. The Energy Demands of the Heart for ATP are among the Highest in the body (after the Brain, which requires mostly Glucose or Ketones for energy)
Converting Conventional CoQ10 (Ubiquinone) into Ubiquinol becomes harder and less Efficient after the Age of 40. Ubiquinol Supplements require no Conversion, making them a more Beneficial Option for many People over 40 compared to CoQ10 Supplementation, as well as for People who are considerably Younger!
The Ubiquinol CoQ10 made by Kaneka is Bio-Identical to the Ubiquinol made Naturally in the Body, this is the preferred form of CoQ10 you should use as a Supplement. Kaneka Nutrients Produces the only Yeast-Fermented and Naturally-Derived CoQ10 that’s Commercially Available, since 1977. They make Ubiquinol CoQ10 in the United States & Japan, then sells the Nutrient to Supplement Companies who use the Ingredient in their Branded Ubiquinol Supplement Products, adding some extra Costs to the End Consumer. When you buy Kaneka Ubiquinol Supplements, make sure it’s produced in either the USA or Japan and Ships from there also, this will save you a few Dollars per Bottle!
If you’re also looking to increase Power Output and improve your Workout Quality while Blasting; 200-300mg Ubiquinol taken 1 Hour Pre-Workout will produce a Significant Improvement! Although this will add another 1-2 USD to your Daily Supplement Expenses.
Shilajit Fulvic Acid
Shilajit or Mumijo is a Blackish-Brown Powder or an Exudate found in the Himalayas, Nepal, Russia, Mongolia and in the north of Chile, where it is called Andean Shilajit. It contains Approximately 15–20% Fulvic Acid and a Small Amount of Minerals and Metabolites derived from Fungi.
Shilajit has been used in Ayurvedic Medicine & Traditional Healing Practices for Centuries, including; Diabetes, Altitude Sickness, Asthma, Heart Ailments & Digestive or Nervous Disorders. There is some Preliminary Evidence that it can also reduce Inflammation, Stimulate the Immune System, Enhance Performance & Boost Testosterone Production, which seems to be a Popular Attribute of most Ayurvedic Supplements…
Fulvic Acid is a Byproduct of Decomposition and can be Extracted from Compost or Soil. It has several Unique Properties, one of which is Improving Mitochondrial Function, when Combined with CoQ10 or Ubiquinol. Studies showed that Mitochondrial Adenosine TriPhosphate (ATP) Production was Significantly Elevated, when CoQ10 or Ubiquinol were Combined with Fulvic Acid.
Personally I take 1 Capsule of 250mg Shilajit Fulvic Acid with Breakfast & Dinner If I Train in the Morning I take my Breakfast Serving of Shilajit Fulvic Acid with 200-300mg Kaneka Ubiquinol CoQ10, 1 Hour Pre-Workout. If I Train in the Evening I take my Dinner Serving of Shilajit & Ubiquinol Pre-Workout. With this Dosing Protocol I don’t exceed 500mg Shilajit Fulvic Acid Total per Day
PyrroloQuinoline Quinone (PQQ)
PyrroloQuinoline Quinone (PQQ) is a Micro-Nutrient that Acts as an Anti-Oxidant in the Body, protecting Cells & Mitochondria from Free Radicals (Oxidants). PQQ is naturally occurring in some Food Sources, albeit in Low Amounts. Matcha Green Tea & Natto (Japanese Fermented Soybeans), Spinach, Parsely & Green Peppers contain notable Amounts of PQQ & Vitamin K, although not in the Concentrations where a few Servings of these Food Sources, provide Adequate Amounts of PQQ.
Like Ubiquinol & Shilajit Fulvic Avid, PQQ improved Mitochondrial Function and has also been shown to increase Mitochondrial Content with Cells, including in the Brain & Heart.
I found that 20mg PQQ with my Pre-Workout Combination of 200-300mg Ubiquinol & 250mg Shilajit Fulvic Acid was enough give me a Noticeable Boost during the Workout. I’ve experimented with 40mg PQQ Pre-Workout as well as 20mg PQQ with Breakfast & Dinner, but I can’t say that I noticed a difference with either Methods compared to 20mg PQQ Pre-Workout. NOTE: Every Time I use PQQ, my Serum Creatinine Levels increase Significantly, between 0.1-0.4 mg/dL on Top of my Baseline Creatinine Levels, which is a lot Higher compared to the increases in Serum Creatinine Levels I get from 5,000mg Creatine HCL per Day. These changes in Creatinine are well Documented in Animal Studies; Creatinine goes up Significantly, while C-Reactive Protein goes down Significantly. After several runs with PQQ Supplementation and improved Workout Capacity, I decided to Discontinue PQQ alltogether as it always increased my Serum Creatinine Levels far Beyond Acceptable Ranges for a 100-115kg Body Builder.
Dose: 1 Capsules of 500mg Boswellia Extract with Breakfast, Lunch and Dinner (3 Capsules per Day, 1,500mg Total) while Cruising, 1 Capsules of 500mg Boswellia Extract with each Meal (4-6 Capsules per Day, 2,000-3,000mg Total) while Blasting
Boswellia Serrata is a Gum Resin Extracted from the Frankinsence Tree. Boswellia Serrata appears to Inhibit a Pro-Inflammatory Enzyme called 5-LipoxyGenase and may possess other Anti-Inflammatory effects by Inhibiting nF-kB Protein Expression. Oral Boswellia Supplementation can Suppress Pain & Immobility associated with Osteo-Arthritis quite Significantly. These Positive Effects take as little as a Week to become Noticeable. Boswellia appears to have promising Anti-Cancer & Tumor benefits, at this point in Time these Studies have only been Performed on Animals & In-Vitro.
By lowering Inflammation in Joints, Tendons & Ligaments, Fluid & Nutrients can readily flow into the Tissue allowing for Increased Recovery and favorable Collagen Synthesis for Strength & Mobility.
A Typical Dose for Body Builders is 3,000mg Boswellia Extract per Day, which can be Split up into 6x 500mg Doses taking with Meals. Most People will Notice Joint Pain Relief & Mobility Improvements within the use of one Bottle of 90 Capsules (13 Days) after which the Dose can be reduced to Maintenance of 3x 500mg per Day with Breakfast, Lunch and Dinner.
Dose: 1 Capsule of 500mg Curcumin Phytosome with Dinner, perhaps another Capsule of 500mg Curcumin Phytosome with Breakfast & Lunch when Joint-Inflammation is Bothersome or Severe.
Curcumin is a Yellow Pigment primarily found in Turmeric, a Flowering Plant of the Ginger Family. Turmeric is commonly used as Spice in Indian, Thai & Malaysian Curry Dishes. Curcumin is a Polyphenol with Potent Anti-Inflammatory Properties and has the Ability to increase the Amount of Anti-Oxidants that the Body Produces Naturally. Turmeric is Poorly absorbed inside the Intestinal Tract, the Curcumin needs to be Extracted and combined either with Peperine, Lipids (Rhizome Essential Oils) or Soy Lecithin (Meriva). I prefer the Meriva or Rhizome Versions of Curcumin Extract.
Supplementation of Curcumin Extracts reduce Inflammatory Blood Work Markers (C-Reactive Protein & Erythrocyte Sedimentation Rate), contribute to Healthy Serum Lipid & Glucose Levels, improve Insulin Sensitivity, reduce Joint Pain & Joint Inflammation due to Injury or Arthritis, improve Blood Flow & reduce High Blood Pressure.
Similar to Boswellia Extract, Curcumin Extract works by reducing Total Body Inflammation and helps to allow Fluid & Nutrients to flow into the previously Inflamed Tissue. However, Curcumin works more Systemically compared to Boswellia and both Supplement should be used in Combination to improve each other’s Anti-Inflammatory Effects on Joints, Tendons & Ligaments.
In order to Reduce Severe Total Body Inflammation & Elevated C-Reactive Protein Levels, a Daily Dosage of 1,500mg Curcumin Phytosome with Meriva is Required (500mg with Breakfast, Lunch & Dinner). This Dose can be Adjusted depending on the Bio-Availability of the Extract & Supplement Formulation. Once Systemic Inflammation has been reduced, C-Reactive Protein Levels are within the Reference Range (ideally below 1mg/L) and Joint Pain or Discomfort is Acceptable, Curcumin Supplementation can be reduced to 500mg per Day with Dinner.
Dose: 4 Capsules of 500mg Astragalus Root Extract with Breakfast & Dinner while Cruising (8 Capsules per Day, 4,000mg Total), 6-8 Capsules of 500mg Astragalus Root Extract with each Breakfast & Dinner while Blasting (12-16 Capsules per Day, 6,000-8,000mg Total), more if Serum Creatinine Levels are elevated.
Astragalus is Herb belonging to the Legume Family Fabaceae & Faboideae. Extracts of Astragalus Root include Diverse Phytochemicals (Saponins & Isoflavone Flavonoids), which have Potent Anti-Oxidant Effects in the Body, as well as Reducing Damage done to the Kidneys and Aiding in Repair of the Glomeruli & Nephrons, restoring Kidney Function Partially or Fully in certain Cases. Most Clinical Studies with Astragalus Root Extract were done on people who suffered Kidney Damage due to Different Diseases, not by the Abuse of PED’s or due to Chronically High Blood Pressure.
The Effects of Astragalus Root Extract on Protecting the Kidneys during Disease States appears to be quite Potent & Reliable, but its Effects on the Kidneys as a Preventative Medicine at Basic Oral Doses below 15g per Day, is not known.
However, Anecdotal Reports on the Kidney Function Restoring Benefits of this Herb have been widely Documented Online by Body Builders & Fitness Enthusiast who used Dosages Ranging from 2-18 Grams per Day, depending on the Severity of the Decline in Kidney Function. The Dose really depends on the decline of Kidney Function, unlike others, with Astragalus Root Extract Supplementation; MORE IS BETTER!
Once Kidney Function has Sufficiently been Restored, the Dose can be reduced to 4,000mg per Day, which is considered to be a Maintenance Dose for Bodybuilders using Moderate amounts of PED’s.
Depending on Serum Creatinine Levels, Astragalus Root Extract Supplementation can range between 2,000mg with Breakfast & Dinner (4,000mg Total), up until 1,500mg with each Meal (9,000mg Total). Personally I use between 4,000-9,000mg Astragalus Root Extract Year Round in order to lower my Serum Creatinine Levels and improve my eGFR Readings on my Blood Work. I increase Astragalus Root Extract Supplementation alongside increases in PED Intake, this keeps my Serum Creatinine around the Top of the Reference Range for my Body Weight & Unnaturally Large Amount of Muscle Mass! NOTE: Astragalus Root Extract was Popularized by Dante Trudel (DC / DOGGCRAPP Training & Owner of TrueNutrition.com DIY Supplement Website) for Kidney Repair & Health! Since it’s Introduction into the Fitness Industry, Countless Enhanced Body Builders, Powerlifters & Strongmen have added Astragalus Root Extract to their Supplementation Protocol. Many Reported improved Glomerular Filtration Rates (eGFR) and reduce Serum Creatinine Levels withing several Months of using Astragalus.
Dose: 1 Capsule of 500mg Citrus Bergamot with Breakfast & Dinner (2 Capules per Day, 1,000mg Total) NOTE: Citrus Bergamot & Red Yeast Rice aren’t used in Combination. They are each used in Specific Scenarios, in order to Manage Lipid Levels while using certain PEDs!
Bergamot is a Citrus Fruit that grows Exclusively in the Coastal Region of Southern Italy. Citrus Bergamot Oil is extracted from the Fruit’s Peel and has an Aromatic Scent, thus it’s commonly used as Flavoring in Earl Grey Tea as well as Scent for Perfumes & Aromatherapy.
Citrus Bergamot Extract is derived from the Juice of the Fruit is rich in Bergamot Polyphenols, which have Potent Anti-Oxidant Effects, help to manage Blood Sugar Levels, improve Serum Lipid Levels as well as reduce Fat Deposits inside the Liver (Fatty Liver Disease). Bergamot Polyphenols also Protect the Body against Risk of Cardio-Vascular Disease, Diabetes, Bone Loss / De-Mineralization & Cancer.
Citrus Bergamot Supplementation has been shown to Directly increase Serum HDL Levels, while reducing Total Cholesterol & LDL Levels within or close to the Healthy Reference Range. Enhanced Body Builders or Fitness Enthusiasts might not see Perfect Lipid Levels, especially when Heavy Androgenic Steroids or Potent SARMs are used. Generally Speaking, Citrus Bergamot Supplements are Potent enough to improve HDL:LDL Ratio while Cruising or using mild Anabolics during the Offseason. However, while Blasting on Higher Dosages or Heavy AAS or SARMs, Citrus Bergamot often needs to be replaced with Red Yeast Rice (Natural Statin) in order to keep Total Cholesterol & LDL Levels within Acceptable Parameters!
It’s very difficult to maintain Healthy Levels of HDL while using AAS or SARMs for that matter. However, it is possible to keep HDL above 60mg/dL on a Hormone Replacement Therapy or Cruising Protocol, with Healthy Eating Habits and Fish Oil / Krill Oil Supplementation. Going above 250mg or 1mg / 1lbs Body Weight of Testosterone per Week, or adding other AAS or SARMs, will most certainly lower Serum HDL Levels below 60mg/dL. HDL often falls between 20-40mg/dL depending on which Compounds are being used, even if Serums Estrogen Levels are allowed to reach 100pg/mL or more, which is Gynecomastia Territory. No amount of Health Supplementation will bring your HDL Levels into the Reference Range while Blasting, minimizing the Time you’re using Heavy Androgenic Steroids or Potent SARMs, or High Dosages of PEDs in General will help to keep Lipid Levels close to the Reference Range, for the Majority of the Time you’re using PEDs.
General Recommendations for Lipid Management while using PEDs is 500mg Citrus Bergamot with either Breakfast & Dinner (1,000mg per Day Total). This Dose will suffice to keep Lipid Levels close to the Reference Range, while using “Milder” Compounds like Testosterone, Nandrolone & Boldenone.
Dose: 1 Capsule of 900mg Red Yeast Rice with Breakfast, perhaps another Capsule of 900mg RYR with Dinner (2 Capsules, 1,800mg Total), when Blasting on Heavy Androgenic Compounds or Potent SARMs. NOTE: Red Yeast Rice & Citrus Bergamot aren’t used in Combination. They are each used in Specific Scenarios, in order to Manage Lipid Levels while using certain PEDs!
Red Yeast Rice is Fermented Rice that is produced using a Specific Species of Mold. It contains the Compound Monacolin K, which is Chemically Similar to the Active Pharmaceutical Ingredient in Cholesterol-Lowering Prescription Medication; Lovastatin. For this reason most Red Yeast Rice Supplements had to lower their Monacolin K Concentrations to Miniscule Levels, in order not to Compete with the Pharmaceutical Industry.
Red Yeast Rice can be a Cost-Effective Alternative to Pricey Statin Medications when more Potent Cholesterol Management is Required when using Heavy Androgenic Compound while Blasting.
The First 18 Steps in Cholesterol Synthesis Encompass the Mevalonate or HMG-CoA Reductase Pathway. Monacolin K works Preventing the Mevalonate or HMG-CoA Reductase Pathway from occuring, Disabling 19 Additional Steps which come afterwards. These Steps convert Lanosterol into Cholesterol, which can then be converted into Steroid Hormones, Bile Acid & Vitamin D.
By Inhibiting an Essential Step in Cholesterol Synthesis in the Liver as well as other Cholesterol Producing Tissues of the Body, including Adrenal Glands & Reproductive Organs (Testicles or Ovaries), Serum Cholesterol & LDL Levels are reduced in a Dose Dependent Fashion with Red Yeast Rice Supplementation. NOTE: This is why Red Yeast Rice should NEVER be used while following a Post Cycle Therapy (PCT) as the Testicles & Adrenal Glands require Cholesterol for Healthy Testosterone, DHEA & Pregnenolone Production.
Preliminary studies indicate that Red Yeast Rice Supplementation might reduce Systemic Inflammation, improve Metabolism and help in the Management of Blood Glucose Levels. How these Benefits compare to Curcumin Phytosome, Boswellia Extract, Fish Oil, Berberine & Apple Cider Vinegar is currently unclear.
General Recommendations for Lipid Management while using PEDs is 900mg Red Yeast Rice with Breakfast, or with Breakfast & Dinner while using Heavy Androgenic Compounds or Potent SARMs. This should prevent Total Cholesterol & LDL Levels from Climbing to Alarmingly High Concentrations, while using Androgenic Compounds like Trenbolone, MENT, Masteron, 17Alpha-Alkylated Oral Steroids or Potent SARMs.
Dose: 1 Capsule of 500mg L-Carnitine-L-Tartrate with each Meal (4-6 Capsules per Day, 2,000-3,000mg Total) during the Offseason, 4 Capsules of 500mg L-Carnitine-L-Tartrate 1 Hour Pre-Workout or Pre-Cardio when Cutting (8 Capsules per Day, 4,000mg Total)
L-Carnitine is a Quaternary Ammonium Compound involved in Metabolism of Short, Medium & Long-Chain Fatty Acids, Creation of Androgen Receptors, Managing Thyroid Levels and Managing ALP, SGPT/ALT, SGOT/AST & Gamma-GT Levels. Cardiac & Skeletal Muscles (the most Metabolically Active Muscle Tissues) contain the Highest Amount of L-Carnitine, where it Accounts for 0.1% of its Dry Mass. Carnitine keeps Liver Markers in the Healthy Range by increased Fatty Acid Metabolism in the Liver, preventing Fatty Liver Disease and protects the Hepatocytes from Destruction while using certain Medication, PED’s or Alcohol. Carnitine also Promotes Cell Membrane Uptake of Gamma-GT, especially when combined with Frequent Coffee Consumption.
When considering L-Carnitine as a Supplement, the L-Tartrate Variation (LCLT) is more Bio-Available for Muscle Tissue compared to Acetyl-L-Carnitine (ALC), which is more Potent in the Brain and has some Nootropic Benefits. LCLT can be taken either in a Single Dose Pre-Workout as Intense Muscular Contractions, increase Carnitine’s absorption into Muscle Tissue, similar to the GLUT4 pathway reducing the Amount of Insulin that is required to absorb Carbohydrates.
Probably the most abundant Amino Acid of Cardiac Tissue and is also used in the Central Nervous System. Taurine helps to maintaining proper Hydration and Electrolyte Balance in your Cells, is used to form Bile Salts and regulates the Immune System.
Taurine can help to reduce High Blood Pressure after Ejection from the Heart by Decreasing the Resistance to Blood Flow in your Blood Vessel Walls. Supplementation has been found to reduce Inflammation and Thickening of the Aortic Artery and other Coronary Arteries.
Taurine Supplementation allows Muscles to work Harder and Longer and increases the Muscles’ ability to Contract and Produce Force. It also aids to remove Waste Products that lead to Fatigue and cause Muscle Soreness and protects (Heart) Muscles from Cell Damage from Oxidative Stress! Weightloss has also been linked to Taurine Supplementation, but that’s from the increased Power Output and ability to Exercise Longer.
Taurine plays an Essential Role in Management of Osmotic Pressure between Intra- & Extra-Cellular Fluids. This is most Notable in the Reduction or Complete Mitigation of Lower Back Pumps & Shin Splint, which is a common Side-Effect seen with AAS or SARMs use. Taurine can also reduce Symptoms of Carpal Tunnel, which is common with Growth Hormone or Growth Hormone-Releasing Peptides (GHRPs) use.
A Typical dose is 3,000-5,000mg 1 Hour before Cardio or Training. Most of the Taurine is utilized during Activity and doesn’t increase Taurine content of Tissue, that’s why it needs to be taken before Activity to supply adequate Taurine for increased Power Output of Heart & Skeletal Muscles as well as Healthy CNS Signals to the Heart & Skeletal Muscles! NOTE: If you’re suffering from Severe Lower Back Pumps, Shin Splints or Carpal Tunnel, a Dose of 1,000-2,000mg Taurine with each Meal is more Beneficial to Mitigate these Side-Effects, compared to a Single Dose of Taurine Pre-Workout. This Dosing Protocol can be Discontinued when Symptoms have subsided!
5-Hydroxy-TryptoPhan (5-HTP) is a Naturally Occurring Amino Acid & Chemical Pre-Cursor as well as a Metabolic Intermediate in the Bio-Synthesis of the Neuro-Transmitter Serotonin, which plays a Key Role in Mood, Sleep & Appetite.
It is commonly used as a Supplement against Depression as well as replenishing Serotonin Levels after the Recreational use of MDMA, a Party-Drug which Depletes Serotonin Levels Tremendously.
One of the Side Effects of 5-HTP is Drowsiness, which makes it suitable to use before Bed as this Drowsiness helps to make you Fall Asleep Faster. Another commonly Reported Side-Effect is Vivid Dreaming, which is compounded if Melatonin & Growth Hormone are used around the same Time as 5-HTP is used. These Dreams might feel like they Lasted a very Long Time upon Waking, Contributing to Feeling Refreshed & Invigorated upon Waking .
A Typical Dose of 5-HTP is 100-200mg around 1-2 Hours before Bed, as the Drowsiness might take some Time to Manifest. If 5-HTP is taken with Food the Drowsiness is reduced or doesn’t appear to Happen, though the Restful Feeling upon Waking will still be there. NOTE: 5-HTP Supplementation should’t be combined with MAOI or SSRI Class Anti-Depressants as they Promote Serotonin Re-Uptake in the Brain, which might lead to Serotonin-Syndrome or Toxicity Levels!
Dose: 1-2 Tablets of 3mg Melatonin with Dinner (3-6mg Total)
Melatonin is a Hormone that Regulates the Sleep-Wake Cycle. It is Primarily Released by the Pineal Gland. As a Supplement, it is often used as a Short-Term Treatment for Jetlag of Working Night Shift. It helps to simulate Parts of the Circadian Rhythm, even outside of the normal Night Time Sleep Cycles, as Melatonin is involved in Synchronizing the Circadian Rhythm, including Sleep-Wake Timing.
Melatonin seems to most Effective in inducing Sleep Faster and keeping your Asleep until you Transition into Non-REM & REM Sleep Cycles. A typical dose is 3mg Melatonin, 30min before Bed, increasing the Dose to 6mg has not been shown to increase Sleep Onset, Quality or Duration, although many enjoy the Drowsiness that 6mg Melatonin Provides alongside 100-200mg 5-HTP Supplementation.
Dose: 1-2 Tablets of 450mg Ashwagandha Root Extract with Dinner (450-900mg Total)
Cortisol Secretion plays in Important Role in the Circadian Rhythm, where Serum Cortisol is at its lowest around Midnight and slowly starts to Rise approximately 2-3 Hours after Entering Sleep. Cortisol continues to Rise into the early Morning and early Waking Hours, where it reaches its peak in around 9 AM and slowly declines throughout the Day.
In Stressful Situations, Night-Time Serum Cortisol is severely elevated to Levels which are commonly seen around the Time of Waking. Making it difficult to Fall Asleep and enter Non-REM Sleep altogether. This can lead to Sleep Deprivation and reduced Hypothalamus, Pituitary & Adrenal Glands Axis (HPAA) Signaling, further increasing Serum Cortisol Levels, which send a Negative Feedback to the Testicles, lowering Testosterone Production. Although this isn’t really a Problem if you’re Replacing your Natural Testosterone Production, Generously!
In order to control Serum Cortisol Levels and keep them Lowered throughout the Night, as well as upon Waking, you can consider using Ashwagandha Root Extract. Best taken in a Single Dose of 450mg, between 1-2 Hours before going to Sleep. People who have a Stressful Job or are in the later Stages of Contest Prep, can take a Second Dose of 450mg upon Waking. This keeps Cortisol somewhat Suppressed during the Day as well. Not only does Ashwagandha Root Extract help to reduce Cortisol Levels, it’s also known to reduce Anxiety, as well as improving Mood & Energy Levels throughout the Day.
Gorilla Dream features a Potent Blend of Ingredients that whisk you into a Deep State of Sleep, an effective Agent that promotes incredibly Lucid Dreams, as well as a Powerful Recovery Blend that supports the minimization of Stress and the maximization of Mind and Body Recuperation. Gorilla Dream doesn’t require additional Ashwagandha Root Extract or Melatonin Supplementation, but both Sleep Aids can be added to increase the onset of Sleep and reduce Cortisol Levels a bit further. 5-HTP is a nice add-on!
Dose: 1 Capsule of 176mg before Dinner or Breakfast & Dinner (1-2 Capsules per Day, 352mg Total)
When Oregano Oil is consumed it acts as an Effective Natural ANTI-Viral, Bacterial, Fungal, Microbial & Parasitic Agent, it’s especially helpful against Candida Overgrowth which can cause terrible Digestive Issues. Due to these Properties it can Support the Body’s Immune System to fight against (Stomach) Infections and prevent People from getting Sick from Bacteria, that typically would cause Food Poisoning otherwise, without Oregano Oil Supplementation. Oregano Oil also aids in lowering Cholesterol Levels and Reduce Inflammation in the Body.
In order to improve Digestion and Kill off any Harmful Bacteria in the Gut Micro-Biome, Oregano Oil should first be taken with each Meal. Most Oregano Oil Supplements contain around 100mg Carvacrol per Capsule, which is a Sufficient Dose to take between 4-6 Times per Day before Meals. After 2 Weeks of Continues use, the Gut Micro-Biome has been Positively improved to favor Healthy Bacteria. Oregano Oil Supplementation can then be reduced to a Maintenance Dose of 1 Capsule Oregano Oil containing around 100mg Carvacrol, before Dinner or Breakfast & Dinner.
Dose: 1 Tablet of 750mg Apple Cider Vinegar with Dinner while Cruising, 1 Tablet of 750mg with each Meal while Blasting (4-6 Tablets per Day, 3,000-4,500mg Total)
Apple Cider Vinegar is all the Hype nowadays, because it works, plain and simple. It appears to be Effective at Suppressing the Speed at which Glucose Enters the Blood, which Lowers the Peak of Serum Glucose Levels & Corresponding Insulin Secretion. It is a slowing Effect with regards to Glucose Metabolism, not a reducing Effect. Apple Cider Vinegar Effectively Lowers the Glycemic Index & Glycemic Load of certain Foods, while increasing Micro-Nutrient Uptake from the same Meal!
Unlike Metformin, it doesn’t slow Digestion down, though it does Lower Gastric Emptying, which is the Rate at which Foods Enters the Intestinal Tract. Apple Cider Vinegar allows Food to be in a further State of Digestion once it Enters the Intestinal Tract, allowing for easier Absorption into the Blood Steam. ACV’s main Active Ingredient is Acetic Acid, which also helps to break down Protein & Fats, besides it’s Beneficial Effect on Carbohydrate Absorption & Glucose Metabolism.
Apple Cider Vinegar can be taking in 2 ways: • 750mg ACV Tablets; 20min before Meals. Make sure you Consume a Decent Amount of Water so the Tablet doesn’t get stuck in your Esophagus. The Tablet might burn a Hole and cause Internal Bleeding if it gets stuck, although it is very very rare for that to happen! • 25ml Bragg’s ACV with “The Mother”; Diluted in 300ml Water and Consumed 10min before each Meal. Drink this Mixture through a Straw otherwise the Acetic Acid will slowly Dissolve your Teeth’s Enamel Layer when you Drink Diluted ACV Frequently!
This Article is an Extension of the Push-Pull-Legs Training Program. Once you’ve reached a point where you can no longer improve with a Push-Pull-Legs A/B Rotation, you can Split Up the Body Parts to a 4 Day, 5 Day or even 6 Day Workout Program and allow each Muscle a few Days of Extra Rest for Additional Recovery & Growth in between the Workouts.
You should be able to Develop the Majority of your Strength, Size, Density, Thickness and Muscle Maturity with a Push-Pull-Legs (A/B) Routine. When this Foundation has been Laid & Solidified, a Multiple-Day Split allows you to Train with more Volume and Focus on Refining your Physique, more so compared to what’s Possible with a Push-Pull-Legs Routine.
Switching from a 3 Day to 4 Day Training Split is another way to Improve Lagging Body Parts, if they’re not that far behind the other Developed Muscle Groups! There are Several Variations in a 4 Day Split when Switching from a PPL Routine, below are some Suggestions on the Initial Separation of Workouts, in order to Improve certain Body Parts: • Chest & Shoulders; Chest & Triceps, Pull, Shoulders, Legs • Biceps & Triceps; Push, Pull, Arms, Legs • Quads & Hamstrings; Push, Quads & Calves, Pull, Hamstrings & Adductors • Back Thickness; Push, Quads & Calves, Arms, Posterior Chain (Pullups, Dead or Rack Lifts, SLDL, Leg Curls, etc.)
Below is an Example of a 4 Day Training Program, where you Separate Leg Day into Quads & Calves Day and Hamstrings & Adductors Day:
Push Day
• Dumbbell Bench Press • Dumbbell Bench Flyes • Seated Cable Flyes • Body Weight Dips • EZ Bar Skull Crushers • Overhead Dumbbell Triceps Extensions • Dumbbell Lateral Raises • EZ Bar Front Raises • Dumbbell Shoulder Press • Hanging Leg Raises
• Body Weight Pullups • T-Bar Rows • Dumbbell Rows • Dumbbell Pullovers • Bent Over Dumbbell Rear Delt Flyes • Barbell Shrugs • EZ Bar Curls • Cable Rope Curls • EZ Bar Reverse Curls • Barbell Wrist Curls
Hamstrings & Adductors Day
• Lying Hamstring Curls • Seated Hamstring Curls • Barbell Stiff Legged Dead Lifts • Smith Machine Swing Curls • Adductor Machine • Barbell Hip Thrust • Reverse Hyper Extensions
Structuring the Workouts in 4 Day Split
The 4 Day Training Split above, makes every Workout a Hardcore Workout, whereas an Extra Arm Workout would give you an “Easy” Day which isn’t as Demanding on your Central Nervous System as 4 Days of Heavy Compound Exercises.
The Example above might cause some Overlap and will Drain your CNS & Recovery if you go Hard on ALL Days, without Adequate Rest Days for Recovery. This means you’ll either have to Train at Reduced Intensity on Days where you Train Body Parts that are already Sufficiently Developed. If your Back is already a Strong Body Part, you basically turn that into the Workload of an Arm Day with 50% Intensity, allowing you to Train All 4 Workout Days in Succession.
Or you Incorporate more Rest Days in between Workouts, Resulting in a 2 Day ON & 1 Day OFF or 1 Day ON & 1 Day OFF approach for Maximum Recovery. In most Cases 2 Day ON & 1 Day OFF will be Sufficient to Train with 100% Intensity, each and every Workout
It highly Depends on how you’ve Developed your Physique with a Push-Pull-Legs A/B Routine and how you’d like to Progress your Physique further. Once you’re ready for a 4 Day Split you should know which Body Parts you Can & Can’t Train in Succession, due to CNS Overlap or Muscle Soreness, Preventing you from Training 100% the next Day!
In most Cases, Arm Development starts to Lag behind the other Body Parts when Following a PPL Routine, because Chest & Shoulders or Back & Traps are basically causing Pre-Fatigue in the Triceps & Biceps, which reduces the Stimulation for Hyper-Trophy, later in the Workout. When you notice that Arms aren’t as Developed as the Body Parts on your Torso or your Legs, moving Biceps & Triceps to their own Arm Day is very Beneficial to increase Recovery and Stimulate these Body Parts during a Separate Workout!
Rest / Recovery Days in 4 Day Routine
Taking Rest Days into Consideration, you can Schedule the Extra Arm Day into your Existing PPL Routine: • 4 Days ON & 1 Day OFF; Push, Pull, Legs, Arms, Off, Repeat! (5 Day Rotation) • 2 Days ON & 1 Day OFF; Push, Pull, Off, Arms, Legs, Off, Repeat! (6 Day Rotation) • 1 Days ON, 1 Day OFF; Push, Off, Pull, Off, Arms, Off, Legs, Off, Repeat! (8 Day Rotation)
In other Cases you might want to Prioritize Leg Development over Arms, because Leg Day is very Taxing and you’re unable to Provide the Required Intensity for Hamstrings or Calves, after you’ve given Everything on Quads. When Leg Day in the PPL Routine becomes too Demanding, your Upper Body is Developed enough and doesn’t require Additional Splitting of Muscle Groups in order to progress, an extra Hamstring Day will greatly Enhance the Development of your Lower Body. While the added Day in between Workout, will aid in the Strength Progression & Recovery of all the Major Body Parts.
Taking Rest Days into Consideration, you can Schedule the Extra Hamstring Day into your Existing PPL Routine: • 4 Days ON & 1 Day OFF; Push, Quads & Calves, Pull, Hamstring & Adductors, Off, Repeat! (5 Day Rotation) • 2 Days ON & 1 Day OFF; Push, Quads & Calves, Off, Pull, Hamstring & Adductors, Off, Repeat! (6 Day Rotation) • 1 Days ON & 1 Day OFF; Push, Off, Quads & Calves, Off, Pull, Off, Hamstring & Adductors, Off, Repeat! (8 Day Rotation)
5 Day Training Split
Once you’ve Completely Maximized Progress on a 4 Day Training Split and it’s Impossible to make Overall Improvements or Improve Lagging Body Parts, even though you’ve Scheduled Deloads, Increased Calories or PEDs or both, you can Transition into a 5 Day Training Split. While keeping Caloric Intake in Mind, a 5 Day Split is usually Preferred in a Caloric Deficit. Since there’s Adequate Rest Days in between Training each Body Part, Recovery remains Intact, even when Calories are Reduced while Workout Volume is increased. In this Case, PEDs are often much Higher compared to the Offseason, where Calories & Training Frequency is High. During a Cutting Phase, PED & Training Volume is High, but Calories & Training Frequency is Low-Moderate, which allows for Similar Recovery Capability and might even extend the need for a Deload, from 6-8 Weeks, to 12-16 Weeks, making it Ideal for an Entire Contest Prep or Cutting Phase.
Below is an Example of a 5 Day Training Program, where you Separate Leg Day into Quads & Calves Day and Hamstrings & Adductors Day, but Group Biceps & Triceps into an Arm Day:
• Lying Hamstring Curls • Seated Hamstring Curls • Barbell Stiff Legged Dead Lifts • Smith Machine Swing Curls • Adductor Machine • Barbell Hip Thrust • Reverse Hyper Extensions
Back & Traps Day
• Body Weight Pullups • EZ Bar Rows • Dumbbell Rows • Dumbbell Pullovers • Bent Over Dumbbell Rear Delt Flyes • EZ Bar Pendlay Rows • Barbell Shrugs • Hammer Strength Shrugs • Cable Shrugs
Biceps & Triceps Day
• EZ Bar Curls • Alternating Dumbbell Curls • Hammer Curls • Overhead Lying Cable Curls • Body Weight Dips • EZ Bar Skull Crushers • Overhead Dumbbell Triceps Extensions • Tate Press • EZ Bar Reverse Curls • Barbell Wrist Curls • Hanging Leg Raises
Switching from a 4 Day to 5 Day Training Split is yet another way to Improve Lagging Body Parts and allow for more Recovery between Workouts. There are Several Variations in a 5 Day Split when Switching from a 4 Day Routine, below are some Suggestions on the Additional Separation of Workouts, in order to Improve certain Body Parts:
Taking Rest Days into Consideration, you can Schedule your Upper-Body Specific 5 Days Split in the Following way: • 5 Days ON & 1 Day OFF; Chest, Legs, Arms, Shoulders, Back & Traps, Off, Repeat! (6 Day Rotation) • 2 Days ON, 1 Day OFF, 3 Days ON & 1 Day OFF; Chest, Legs, Off, Arms, Shoulders, Back & Traps, Off, Repeat! (7 Day Rotation) • 2 Days ON & 1 Day OFF; Chest, Legs, Off, Arms, Shoulders, Off, Back & Traps, Chest, Off, Legs, Arms, Off, Shoulders, Back & Traps, Off, Repeat! (15 Day Rotation)
Taking Rest Days into Consideration, you can Schedule your Lower-Body Specific 5 Days Split in the Following way: • 5 Days ON & 1 Day OFF; Chest & Triceps, Quads & Calves, Shoulders, Hamstrings & Adductors, Back & Traps & Biceps, Off, Repeat! (6 Day Rotation) • 2 Days ON, 1 Day OFF, 3 Days ON & 1 Day OFF; Chest & Triceps, Quads & Calves, Off, Shoulders, Hamstrings & Adductors, Back & Traps & Biceps, Off, Repeat! (7 Day Rotation) • 2 Days ON & 1 Day OFF; Chest & Triceps, Quads & Calves, Off, Shoulders, Hamstrings & Adductors, Off, Back & Traps & Biceps, Chest & Triceps, Off, Quads & Calves, Shoulders, Off, Hamstrings & Adductors, Back & Traps & Biceps, Off, Repeat! (15 Day Rotation)
The 5 Day Split is often Performed over the Course of a Week, allowing for 2 Days OFF in between 2/3 Days ON. Usually you take a Day OFF after a Quads, Hamstrings or Back Day in a 5 Day Training Split, with a Chest, Shoulder or Arms Day as Padding in between the 3 Most Demanding Workouts of the Week; Quads & Calves / Back & Traps / Hamstrings & Glutes. Again, it highly depends on how you Chose to Split up the Body Parts in your Personalized 5 Day Split.
In some Cases there’s no Padding in between Demanding Workouts, and you might have to Lower the Intensity to Prevent Over-Stimulation of CNS or Compounding Workload which reduces Overall Recovery and might Result in Over-Training.
There are many ways to Split up your Body Parts for a 5 Day Workout Routine. You can also go with; Chest & Shoulders, Hamstrings & Adductors, Off, Back & Traps, Biceps & Triceps, Quads & Calves, Off, Repeat! It all depends on how you Recover, the Overlap Body Parts and which Body Parts you’d like to improve the most!
6 Day Training Split
This is Freak Territory and doesn’t apply for the Majority of the People to be Completely Honest. Most of us can’t sustain 6 Days per Week of Intense Workouts, unless you’re on a Boatload of PED’s and Calories to Fuel the Workouts and actually Recover from Training 6 Days per Week!
A 6 Day Split is High Volume Heaven, with Insulin Pre-Workout to Shuttle the Essential Amino Acids, Creatine, High Branch Cyclic Dextrin’s & Electrolytes into the Muscle, while perhaps also using OTC Pre-Workouts, 300-400mg Ubiquinol, 2-5 Puffs Ventolin (Salbutamol), Offseason Anabolics that increase RBC Count & Hematocrit, Cialis, Injectable AmPK & EPO, basically anything that Actually increases Performance in order to Sustain 2 Hour Workouts.
Taking Rest Days into Consideration, you can Schedule your 6 Days Split in the Following way: • 6 Days ON & 1 Day OFF; Chest & Abs, Quads & Calves, Biceps & Triceps, Hamstrings &
This basically means you Train ALL Major Body Parts and a Secondary or Ancillary Body Part on Separate Days, which allows for very High Volume per Workout, with Adequate Muscle Group Specific, Recovery Capability in between Workouts.
Although you’ll be Training 6 Days per Week; Moderate-High use of Performance Enhancing Drugs (PEDs), Structured & Timed use of Performance Enhancing Supplementation (PESs), High Caloric Intake with Accompanying Pharmacology, should Provide Adequate Recovery Capability with Limited Rest Days. Even when Calories are Restricted during a Contest Prep or Cutting Phase, Recovery shouldn’t be Impacted too Severely, especially when Volume is Reduced alongside the Caloric Deficit. Utilizing 100% of the Nutrients for Recovery, while pulling a bit of Body Fat from Reserves in order to Fuel Hyper-Plasia & Energy Production!
On a 6 Day Split Body Builders usually do 6 Exercises for the Main Body Part, followed by 3-4 Exercises for the Secondary or Ancillary Body Part you Train during the Workout. Workouts Typically last around 1 Hour as there’s very little need to Warmup or Prime other Body Parts, as those are Trained on other Days. With a Conventional PPL Routine, you spend a lot of Time on Warmup Sets, Feel Sets & Priming Body Parts before you reach your Working Weight. While with a 6 Day Split, you Perform a few Warmup Sets & Feel Sets for the Main Body Part, after your First Working Sets you merely need 1 or 2 Feel Sets in order to Prime yourself for another Working Set in the next Exercise. In the Meantime your Secondary Body Part gets Sufficiently Primed as well, reducing the need for Additional Warmups or Feel Sets, Allowing you to Transition straight into the next Body Part with little Time in between!
Keep in mind that Progressive Overload goes Completely out of the Window on a 6 Day Split during a Cutting Phase, as you’re simply trying to Maintain Size & Strength by Spacing Body Parts away from each other, reducing Overlap, while allowing for the most Amount of Recovery the Caloric Deficit, Moderate-High PEDs & Recovery Days between Workouts can Provide.
Many Body Builders chose to Rotate Exercises Week by Week, never Performing the same Workout as the Week before. Broscience tells us this Prevents Adaption, because it’s hard to make Continues Progress in regards to Working Weight and/or Reps during the Set, when Calories are Restricted for a Prolonged Period of Time. Another Part of this Philosophy to Rotate Exercise Weekly, is the Defeated Feeling you get, when your Strength starts declining on your Favorite Exercises. Since you’ve been working so hard to grow using Progressive Overload during the Offseason, seeing your Lifts reduce in Total Reps, followed by a reduction in Working Weight, is a Hard Pill to Swallow.
That’s why most Body Builders prefer to Train by Feel during the later Stages of a Contest Prep or Cutting Phase and do Exercises they Enjoy, Exercises that Feel Safe, Exercise that are easy to Setup but Provide Adequate Stimulation for Hyper-Trophy, Preserving Muscle Tissue even when Training Intensity is Balanced to a fine Line between Stimulation & Injury.
Once you’re at this Level you owe yourself an Obligatory Trip to the Muscle Factory Bangkok, Golds Gym Venice, Bev Francis’ Powerhouse Gym New York or Oxygen Gym Kuwait!!
In this Article I’ll describe how to Intermediate Lifters can Switch into a Push-Pull-Legs Routine and make the most Progress possible, before they need to Transition into a Multiple-Day Training Split. You can read about other Training Splits here:
There are several ways to Design your own Personalized Push-Pull-Legs Training Program.
First; assess which Body Parts you want to Improve over the next few Weeks and Prioritize them earlier in the Week and at the start of each Workout.
Second; based on the Amount of PEDs and Calories/Nutrients you’re getting in every day, decide how many days of Recovery you need before you do a Consecutive Push, Pull or Legs Workout. This will decide how many Days Off you need and if you can Incorporate Resistance Bands, Rest-Pause Techniques, Widow Makers Sets, Drop Sets or Training Beyond Failure!
In the Beginning of Following a Push-Pull-Legs Routine, Progress will come Relatively Easy, especially if you came from a Full-Body or Upper / Lower Routine Previously. The added Recovery you get from Spacing Body Parts apart with Several Days is more than enough to make Progress every Single Workout. However, the Longer your Follow a Push-Pull-Legs Routine, the Harder it is to make Consistent Progress with Regards to Progressive Overload. Due to Overlap of Exercises, Moving Insanely Heavy Weight, which Require more & more Calories and perhaps PEDs to Facilitate Recovery as well as Chronic Micro-Injuries, which Detract from Maximum Training Intensity to Progress beyond certain Training Plateaus.
Push-Pull-Legs is a very Popular Training Split can is used by Intermediate to the most Advanced Body Builders. It’s one of my Favorite Methods to Train when I’m Eating in a Caloric Surplus with Moderate Dosages of Steroids, between HRT & 1,000mg AAS Combined per Week. Beyond 1,000mg AAS I’m usually in a Caloric Deficit, which Requires more PEDs to Facilitate Recovery to Compensate for Restricted Caloric Intake. In this Case I also need more Recovery Days in between Training each Body Part and usually Switch to a 4, 5 or 6 Day Workout Routine.
I’ve done many Versions of a Push-Pull-Legs Routine, the one that gave me the Most Results was a Modified “Free Weights Only” PPL Routine. It wasn’t Completely Free Weights Only, as I found that Hamstrings & Calves still Required Machines for Proper Stimulation. Basically the PPL Routine consisted of as many Free Weight Exercises as I could Perform, with Limited use of Equipment unless Absolutely Necessary!
Below is the exact “Free Weights Only” PPL Routine with Machines for Hamstrings, Adductors & Calves:
Push Day
• Incline Dumbbell Press • Incline Dumbbell Flyes • Incline Hex Press • Bodyweight Dips • EZ Bar Skull Crushers • Tate Press • Overhead Dumbbell Triceps Extensions • Dumbbell Lateral Raises • EZ Bar Front Raises • Dumbbell Shoulder Press • Lying Crunches
Pull Day
• Bodyweight Pullups • Underhand EZ Bar Rows • Dumbbell Rows • Decline Dumbbell Pullovers in Situp Bench • Dumbbell Rear Delt Flyes • EZ Bar Pendlay Rows • Dumbbell Shrugs • EZ Bar Curls • Dumbbell Hammer Curls • Alternating Dumbbell Curls in Preacher Bench
Leg Day
• Barbell Squats • Sumo Squats with Plates & Cable Crossover Handles • Dumbbell Bulgarian Split Squats • Barbell Hip Thrusts or Adductor (Machine) • Lying Hamstring Curls (Machine) • Smith Machine Swinging Hamstring Curls • Barbell Stiff Legged Dead Lifts • Seated Calf Raises (Machine) • Donkey Calf Raises (Machine) • Standing Calf Raises (Machine)
Structuring the Workouts in PPL Split
In this Routine, each Workout Contains 10 Working Sets over 10 Exercises (excluding Abs). Although you might Perform a Total of 30 Sets over the Entire Workouts; 3 Sets of 20 Reps to Warmup, 5 Sets of 4-6 Reps to Prime Motor Patterns before the First Working Set, then 1 or 2 Feel Sets when Switching Exercises to Prime Motor Patterns before Working Sets on Consecutive Exercise.
When Starting a Push-Pull-Legs Routine, which is a 3-Day Workout Split, you Group 3 Corresponding Body Parts per Workout and Perform 3 Exercises per Body Part. While a 4th Exercise can be an Overlapping Exercise in order to Prime the next Body Part, for Example; Dips between Chest & Triceps or Hip Thrust between Quads & Hamstrings. This usually Results in 9-11 Exercises per Workout.
The Exercise Selection for each Body Part should Contain; 1 Compound, 1 Stretch under Load & 1 Isolation Exercise. Sometimes these Exercise Types are be Combined, for Example; Dumbbell Flyes is both an Isolation & Stretch Exercise & Stiff Legged Dead Lifts is both a Compound & Stretch Exercise.
Ideally you Perform the Stretch under Load Exercise AFTER you’ve Performed the Compound Exercise, as it makes the Isolation Exercise more Effective. Of course it doesn’t always play out that way. SLDLs after Hip Thrusts is BRUTAL on your Posterior Chain and might cause Tremendous Lower Back Pumps!
Try your Best to Design your PPL Program along these Lines; Weaker Body Part, followed by Ancillary Body Part that gets Recruited with the Main Body Part you’re trying to Improve, with the Stronger, Most Developed or least Important Body Part of the Group Performed Last in the Workout. That might mean you do Calves, Hamstrings, Adductors and Quads last in the Workout if you’re Quad-Dominant with shitty Calves!
Each Body Part is Trained along these Lines; 1st Exercise: Compound, 2nd Exercise: Stretch, 3rd Exercise: Isolation, 4th Exercise: Overlap (optional). While Following the Principles of Progressive Overload along each Body Parts Respective Rep Ranges for Hyper-Trophy!
While you’re Training, you’re only Allowed 1 Working Set per Exercise. This “Restriction” makes it very easy to Track your Progression in each Lift/Exercise and is there prevent Over-Training! If you Perform 9-11 Exercises per Workout, with a Typical High-Volume Approach as seen in 4, 5 or 6-Day Splits, you’ll cause too much Stimulation that you can Recover from.
PPL Routines which Follow Progressive Overload are Extremely Precise and well thought out Training Programs where you have Clear Goals that you need to Attain or Break every Workout. There’s no Room for Fluff as Extra Fluff reduces your Recovery Capability, which becomes increasingly Important as you Gain Size & Strength.
Rest / Recovery Days in PPL Routine
At the Beginning of Starting a PPL Routine, you can Schedule a Rest Day after you’ve Finished the Entire PPL Rotation. Meaning you Train 3 Days ON & 1 Day OFF, which Results in this Schedule: Push, Pull, Legs, Off, Repeat!
You can Follow this Schedule until you’re too Strong for your Recovery Capability and you need an Extra Rest Day (or more Calories or PEDs) in order to keep Progressing Forward & Upward! Scheduling an Extra Rest Day is probably Harder than adding more Calories or PEDs to Improve Recovery, but it’s often the Smarter Approach when you become Insanely Strong and Move Mountains of Weight each and every Workout!
By Adding another Rest Day, you Switch from 3 Days ON & 1 Day OFF to 2 Days ON & 1 Day OFF, which Results in this Schedule: Push, Pull, Off, Legs, Push, Off, Pull, Legs, Off, Repeat!
Look at it in another way, by adding another Rest Day, you’re actually increasing Calories & PED Intake for each Workout. Since this Intake doesn’t change, but the Workload actually Decreases, you now have more Nett. Available Calories & PEDs per Workout & Required Recovery, without Upping either Aspect of your Body Building.
Once 2 Days ON & 1 Day OFF still doesn’t allow for enough Recovery Capability as you’ve gotten even Stronger on this Training Schedule, you can Switch to this Schedule; Push, Pull, Off, Legs, Off, Repeat!
This 2 Days ON, 1 Day OFF, 1 Day ON & 1 Day OFF Approach allows for the Maximum Amount of Stimulation & Recovery, before Push-Pull-Legs becomes somewhat Redundant and a 4, 5 or 6 Day Split is more Beneficial for Hyper-Trophy, as you’re able to Double the Volume for each Body Part with a Multiple-Day Split.
You can Schedule the Rest Days in your PPL Routine in the Following ways: • 3 Days ON & 1 Day OFF; Push, Pull, Legs, Off, Repeat! (4 Day Rotation) • 2 Days ON & 1 Day OFF; Push, Pull, Off, Legs, Push, Off, Pull, Legs, Off, Repeat! (9 Day Rotation) • 2 Days ON, 1 Day OFF, 1 Day ON & 1 Day OFF; Push, Pull, Off, Legs, Off, Off, Repeat! (6 Day Rotation)
Push-Pull-Legs: A/B Training Split
Once you get Incredibly Strong & Advanced in your PPL Routine, you can switch to an A/B Split and Space the Taxing Exercises further apart to give yourself more Time for Recovery without Additional Food or PED Intake. You should be well Versed in Execution of Exercises and know how to Cycle through your Training Program with Warmup Sets, Feel Sets & Working Sets by this Time.
Below is an Example of a PPL A/B Routine:
Push-A
• Incline Dumbbell Press • Incline Dumbbell Flyes • Flat Hammer Strength Chest Press • Body Weight Dips • EZ Bar Decline Skull Crushers • Overhead Cable Triceps Extensions • Dumbbell Lateral Raises • EZ Bar Front Raises • Hammer Strength Shoulder Press • Body Weight Alternating Crunches
• Cable Pull Downs • Underhand EZ Bar Rows • Dumbbell Rows • Cable Pullovers • Dumbbell Rear Delt Flyes • Dumbbell Shrugs • EZ Bar Curls • Hammer Curls • EZ Bar Reverse Curls • Barbell Wrist Curls
Pull-B
• Body Weight Pullups • T-Bar Rows • Hammer Strength Rows • Dumbbell Pullovers • Machine Rear Delt Flyes • Hammer Strength Shrugs • Alternating Dumbbell Curls • Cable Rope Curls • EZ Bar Reverse Curls • Barbell Wrist Curls
Legs-A
• Barbell Squats • Leg Press • Leg Extensions • Barbell Hip Thrust • Lying Hamstring Curls • Stiff Legged Deadlifts in Hack Squat • Reverse Hyper Extensions • Seated Calf Raises • Donkey Calf Raises • Seated Toe Presses
Legs-B
• Hack Squats • Bulgarian Split Squats • Seated Leg Press • Hip Thrust Machine • Seated Hamstring Curls • Barbell Stiff Legged Deadlifts • Adductor Machine • Seated Toe Presses • Donkey Calf Raises • Seated Calf Raises
Structuring the Workouts in PPL A/B Split
Each Body Part is Trained along these Lines; 1st Exercise: Compound, 2nd Exercise: Stretch, 3rd Exercise: Isolation, 4th Exercise: Overlap (optional). While Following the Principles of Progressive Overload along each Body Parts Respective Rep Ranges for Hyper-Trophy
Same Design as a Standard PPL Routine; 1st Exercise: Compound, 2nd Exercise: Stretch, 3rd Exercise: Isolation, 4th Exercise: Overlap (optional). With an A/B Split you Cycle through each PPL-A & PPL-B Rotation in order to Prevent or Minimize Training Plateaus, Training Overlap & Keep your CNS Fresh for each Exercise, as you Perform Similar, but not the Same Exercises every A/B Rotation!
Rest / Recovery Days in PPL A/B Routine
You can Schedule the Rest Days in a PPL A/B Routine, in a Similar Fashion as a Standard PPL Routine: • 3 Days ON & 1 Day OFF; Push-A, Pull-A, Legs-A, Off, Push-B, Pull-B, Legs-B, Off, Repeat! (8 Day Rotation) • 2 Days ON & 1 Day OFF; Push-A, Pull-A, Off, Legs-A, Push-B, Off, Pull-B, Legs-B, Off, Repeat! (9 Day Rotation) • 2 Days ON, 1 Day OFF, 1 Day ON & 1 Day OFF; Push-A, Pull-A, Off, Legs-A, Off, Push-B, Pull-B, Off, Legs-B, Off, Repeat! (10 Day Rotation)
You’ll have between 8-10 Days before you do the Exact same Exercise again, which is Plenty to Time to Recover from the last Set to Failure and build upon your Previous Best!
Once you’re reached a Complete Plateau and can’t make any more Progress on the A/B PPL Split, while training 2 Days ON, 1 Day OFF, 1 Day ON & 1 Day OFF, which can take YEARS, it’s better to Transition into a 4, 5 or 6-Day Split.
You should be able to Develop the Majority of your Strength, Size, Density, Thickness and Muscle Maturity with a Push-Pull-Legs (A/B) Routine. When this Foundation has been Laid & Solidified, a Multiple-Day Split allows you to Train with more Volume and Focus on Refining your Physique, more so compared to what’s Possible with a Push-Pull-Legs Routine.
DC Training is a Highly Specialized Hybrid-Version of the Upper / Lower Body & Push-Pull-Legs Split, which Focuses on Progressive Overload and Utilizes Exercise Overlap to Transition from 1 Body Part to the other.
Once you’ve past the Beginner Stages of Working Out and are able to Follow a Regimented Fitness Routine for Body Building Purposes. You already know how to find your Way around the Gym and are able how to Connect with each Muscle & Body Part Individually. You’re able to Structure your Day & Diet in a way to Improve Recovery and Maximize Training Intensity.
Then you’re ready to Progress from a Full Body Workout, into an Upper / Lower Body Workout Split. Hopefully you’ve also Figured out which Rep-Ranges each Muscle Group responds to with Regards to Hyper-Trophy, but it’s not a Prerequisite before Switching!
In this Article I’ll describe how to Beginners can Switch into a 2-Day Workout Program and make the most Progress possible, before they need to Transition into a Push-Pull-Legs or Multiple-Day Training Split.
We’re going to Assume that you’ve been Following a Full-Body Training Program for 3 to 5 Days per Week, prior to Starting the Upper / Lower Body Split. During this Time you’ve figured out which Exercises you’re Bio-Mechanically able to Perform, Exercises you Enjoy doing and know which ones you don’t Enjoy doing. Keep in mind that certain Exercises are Required to Develop a Balanced & Proportioned Physique. Not because they’re DO-or-DIE & Mandatory Exercises, but because you’ve Developed Lagging Body Parts and you need to Perform Specific Exercises to Improve these Body Parts to Compliment your Physical Development!
However, in order to make a Generic Upper / Lower Body Split that most People can Incorporate, I won’t take Lagging Body Parts into Consideration in the Examples below.
Similar to a Full-Body Program, you can use Budget of Exercises that you Cycle through, throughout the Week or X Amount of Upper / Lower Rotations. For the Sake of Completeness, we’ll Choose from 1-2 Different Exercises per Body Part, although some might cause some Overlap with either Upper or Lower Body and should be Programmed Accordingly!
From this Wide-Variety of Exercise Selection you can chose 1 Free Weight or Machine Compound and 1 Free Weight or Machine Isolation Exercise for the Larger Body Parts; Chest, Shoulders, Back, Quads & Hamstrings. While you can choose either 1 Free Weight or Machine, Compound / Isolation Exercise for the Smaller Body Parts; Biceps, Triceps, Adductors, Glutes & Calves.
If you’ve already Figured out your Rep Ranges for each Respective Body Part, then you can stay with the Rep Ranges that work well for you. Otherwise you can Break the Body Parts down according to the Following Rep Ranges: • Chest, Shoulders, Back, Hamstrings & Glutes; 6-10 Reps • Biceps, Triceps, Adductors; 8-12 Reps • Quads, Calves & Abs; 10-15 Reps
Bigger Body Parts with 2 Exercises have 4 Sets in the 1st Compound Exercise, followed by 2 Sets in the 2nd Isolation Exercise. While Smaller Body Parts with 1 Exercise, can have Sets during the Compound / Isolation Exercise. Each Body Part is Performed in it’s Specific Rep-Ranges, Cycling from the Higher End of the Range at the 1st Set, to the Lower End of the Range towards the latter Sets.
In order to Warm-Up before you start your Workout, you can either choose to do 10 Minutes of Elliptical Cardio at Medium Intensity or do 2 Sets of 20 Reps of the First Exercise you chose to do, before increasing Weight in order to get 4 Sets that Body Parts Specific Rep Range.
If your Day & Diet has been Structured to your Fitness or Body Building Aspirations, in order to Improve Recovery & Maximize Training Intensity, you can choose to Train 2 Days ON & 1 Day OFF; Upper, Lower, Rest, Upper, Lower, Rest, etc.!
Otherwise it’s best to Stick with a Every other Day Approach to allow for Adequate Recovery Time in between Workouts.
Either way, it’s best to Limit your Exercise Selection on Upper & Lower Body Days to 10 Exercises Maximum. Including Warmup Sets, this usually Results in a Workout Budget of around 25-30 Sets over the Entirety of the Workout.
It’s also VERY Important to Constantly Select Different Free Weight & Machine Exercises throughout the Upper / Lower Rotations. In order to Prevent Overlap of Exercises & Over Training, as you’re Training Body Parts every 3 Days!
The Aim is not to go to Beyond Failure on ANY of the Sets as you’ll be Training each Body Part again 2-3 Days later. Your Goal is to improve your Mind-Muscle Connection with each Exercise and learn how to Properly Contract your Muscles against Resistance. Once you’ve learned to Master that, you can Progress into a Push-Pull-Legs Routine! P-P-L has more Recovery Days in between Workouts, which allows for Beyond Failure Training.
With the Exercise Selection, Workout Budget & Advised Rep-Ranges, you can Program the Split in the Following Way:
Once you’re a little bit more Advanced in your Upper / Lower Body Routine, you might choose to Focus a bit more on Lagging Body Parts, by Choosing 3 Exercises for Lagging Body Parts, while Preserving Workout Intensity, by reducing Exercise Selection for other Body Parts. Or excluding certain Isolation Exercises as Biceps, Triceps, Adductors & Glutes are already Recruited in Heavy Compound Exercises for Chest, Shoulders, Back, Quads & Hamstrings.
It’s Impossible to Predict where you need to make Adjustments as everybody Develops their Physique based on their own Genetic Strengths & Limitations. Bio-Mechanics become more Important as you Progress from an Upper / Lower Body Routine into Push-Pull-Legs or a 4, 5 or 6-Day Training Program. Allowing for more Recovery in between Body Parts, eventually leads to more Strength, which Results in Accrual of new Muscle Tissue. This Changes your Leverages & Bio-Mechanics, which Impacts your Exercise Selection, Workout Programming and in some Cases, your Rep-Ranges as well!
Before one gets started with Bodybuilding, or can follow any sort of Regimented Fitness Routine, you must First find your Way around the Gym and learn how to Connect with each Muscle & Body Part Individually. In this Article I’ll describe how to Beginners can get Started and make the most Progress possible, before they Transition into a Push-Pull-Legs or Several Day Training Split.
The First Time you Entered a Gym, you probably had no Idea what to do, which Machines to use and you certainly didn’t know the Correct Order of Exercises for Maximum Hyper-Trophy Stimulation. And that’s totally fine because most People have to learn how to ride a Bicycle, how to Swim or play any sort of Team Sports as well. So let’s start with the Basics and allow your own Body to tell YOU, how the Exercises need to be Programmed!
Since you’ll be doing a Full Body Routine, at least 3 Times per Week, it’s better to start with a Budget of 15 Exercises and choose which Exercises you want to do, in whatever Order or whatever Day you prefer to do them on. This allows you to slowly change Exercises around, based on how Sore you are, how much Overlap one Exercise exerts over another Exercise, later in the Workout and if certain Exercises reduce Performance on other Exercises, Performed later in the Week.
Full-Body Exercise Budget
• Dumbbell Bench Press • Cable Crossover • Dips • Cable Pull Downs • T-Bar Rows • Dumbbell Rear Delt Flyes • Standing Barbell Press • Dumbbell Lateral Raises • EZ Bar Curls • EZ Bar Skull Crushers • Squats • Leg Press • Barbell Stiff Legged Dead Lifts • Walking Lunges • Seated Calf Raises
Once you’ve made your Selection of Exercises for that Particular Workout, you won’t be able to Perform them again in the same Week. Every Week your Exercises Budget Resets and you want Pick & Choose from your List of Exercises, in any Order or Perform them on any Day you prefer.
You will Perform each Exercise with 4 Sets of 15-12-10-8 Reps Respectively. In order to Warm-Up before you start your Workout, you can either choose to do 10 Minutes of Moderate Intensity Cardio on the Elliptical or Stair Master, or do 3 Sets of 20 Reps on the First Exercise you chose to do, before increasing Weight in order to get 4 Sets of 8-15 Reps.
The Aim is not to go to Failure on any of the Sets as you’ll be Training that Muscle again 2 Days later. Your Goal is to improve your Mind-Muscle Connection with each Exercise and learn how to properly Contract your Muscles against Resistance. Once you’ve learned to Master that, you can progress into an Upper-Lower or Push-Pull-Legs Routine!
With this Exercise Budget, you can Split it up in the following Fashion: • Monday; Dumbbell Bench Press, Cable Pull Downs, Standing Barbell Press, Squats & Seated Calf Raises. • Wednesday; Cable Crossover, T-Bar Rows, Dumbbell Lateral Raises, EZ Bar Skull Crushers & Leg Press. • Friday; Dips, Dumbbell Rear Delt Flyes, EZ Bar Curls, Barbell Stiff Legged Dead Lifts & Walking Lunges. NOTE: Including Warmups, each Exercise Consists of a Total of 23 Sets over 5 Exercises, which Recruit most Body Parts!
Once you’re a little bit more Advanced in your Full Body Routine, you might choose to Group certain Exercises and Split your Budget as followed: • Monday; Dumbbell Bench Press, Cable Crossover, Standing Barbell Press, Dumbbell Lateral Raises & Squats. • Wednesday; Cable Pull Downs, T-Bar Rows, Dumbbell Rear Delt Flyes, Barbell Stiff Legged Dead Lifts & Seated Calf Raises. • Friday; EZ Bar Curls, EZ Bar Skull Crushers, Dips, Leg Press & Walking Lunges. NOTE: Including Warmups, each Exercise Consists of a Total of 23 Sets over 5 Exercises, which Recruit most Body Parts!
Expect to Follow this Program for about 3-6 Months, at which Point you should have Solid Understanding of how to Perform these Exercises, Correct Form and the Succession of Exercise Selection. Whenever you Complete 4 Sets of a certain Exercise, there’s an Ideal Exercise that could Follow due to it’s Complimentary Overlap. You can follow a Chest Exercise with a Tricep Exercise, a Back Exercise with a Bicep Exercise, a Quad Exercise with a Hamstring or Calf Exercise. An Exercise that Recruits one Body Part, often Stimulates another and Primes it for a Follow-up Exercise.
Over the Course of 3-6 Months, which has about 13-26 Exercise Budget Rotations and 39-78 Workouts in Total, you should be able to Design a Personalized, 3 Day per Week, Full Body Routine for yourself!
5 Day Full-Body Routine
Once you’ve got some Experience with a 3 Day per Week Full Body Routine and if you feel you can Recover from more Workout Volume, you can increase your Exercise Budget to 30 Exercises and Perform them over 5 Workouts every Week. Ideally you follow the 15 Exercises Budget over 3 Days per Week for Several Weeks or Months before you increase for a bit more Volume.
That way you’ll learn how to Perform the Most Basic Exercises which will often Remain a Staple in your Fitness or Body Building Routine for Years to follow. Once you’ve got some Experience with those Exercises and know how to Perform them Correctly, you can add another 15 Exercises to your Exercise Budget.
Extended Full-Body Exercise Budget
• Dumbbell Flyes • Barbell Bench Press • Dumbbell Rows • Barbell or Trap Bar / Hex Bar Dead Lifts • EZ Bar Front Raises • Seated Dumbbell Press • Dumbbell Hammer Curls • Cable Triceps Push Downs • Leg Extensions • Sissy Squats • Lying Hamstring Curl • Seated Hamstring Curl • Standing Calf Raises • Donkey Calf Raises • Lying Crunches
With this Exercise Budget of 30 Exercises, you can Split it up in the following Fashion: • Monday; Dumbbell Bench Press, EZ Bar Front Raises, Cable Pull Downs, Cable Triceps Push Downs, Squats & Donkey Calf Raises. • Tuesday; Seated Dumbbell Press, Dumbbell Flyes, Leg Extensions, Barbell Stiff Legged Dead Lifts, EZ Bar Curls & Lying Crunches. • Wednesday; Barbell Bench Press, Dumbbell Lateral Raises, EZ Bar Skull Crushers, T-Bar Rows, Leg Press & Walking Lunges. • Friday; Dumbbell Rows, Dips, Cable Crossover, Lying Hamstring Curl, Sissy Squats & Seated Calf Raises. • Saturday; Standing Barbell Press, Dumbbell Rear Delt Flyes, Barbell Dead Lifts, Dumbbell Hammer Curls, Seated Hamstring Curl & Standing Calf Raises. NOTE: Including Warmups, each Exercise Consists of a Total of 27 Sets over 6 Exercises, which Recruit most Body Parts!
On this Routine Recovery & Auto-Regulation becomes more Important as you’re Training the same Body Parts, 2-3 Days in a Row. This makes it increasingly Hard to Program the Workouts based on your Exercise Budget, as you can’t really Predict the Rate of Recovery, unless you also adjust your Nutrition, Stress Levels, Sleep Patterns and Activity Levels outside of the Gym.
Adjustments & Variations for Additional Progress
Ofcourse there are many more Exercises to choose from Compared to these 15-30 Exercises mentioned above, they are what we consider the Bread & Butter of Building a Physique. As yours Develops, you might have to Rotate certain Exercises out for an Alternative, targeting the same Muscle Group. Or remove an Exercise for a Specific Body Part, that grows Faster than the other Body Parts. You might choose to replace Stiff Legged Deadlifts with Romanian Deadlifts for more Hamstring Development, or replace Dips with Close Grip Bench Press for more Triceps Development. You’ll have to decide which Exercises have to be Exchanged for others in order to keep each Body Part Developing at an equal rate.
Exercise Budget Alternatives
• Hammer Strength or Machine Chest Press • Dumbbell or Kettlebell Hex Press • Close Grip Diamond Pushups • Hammer Strength or Machine Shoulder Press • Cable Lateral Raises • Close Grip Barbell Bench Press • Tate Press • Overhead Dumbbell Triceps Extensions • Body Weight or Weighted Pullups • EZ Bar Underhand or Barbell Rows • Hammer Strength or Machine Pulldowns • Dumbbell or Cable Pullovers • Dumbbell or Barbell Shrugs • Barbell Rack Pulls • Cable or Dumbbell Front Raises • Cable or Machine Rear Delts • Barbell Pendlay Rows • Cable Face Pulls • Alternating Dumbbell Curls • EZ Bar Preacher Curls • Overhead Cable Curls • Hack Squats / V-Squats / Pendulum Squats • Bulgarian Split Squats • Dumbbell Sumo Squats • Barbell Hip Thrust • Glute/Ham Raise • Smith Machine Swing Curl • Reverse Hyper Extensions / Hyper Extensions • Hanging Leg Raises • Cable Crunches
With this wide Selection of Exercises in your Weekly Budget, you could simply close your eyes, point at an Exercise that you haven’t done yet that Week and perform it. When you Train 5 Days per Week on; Monday, Tuesday, Wednesday, Friday & Saturday for example, it’s very important to keep track of which Exercises give you Soreness and hinder you to perform other Exercises later in the Week.
Beginners will always change the order of the Exercises and start Grouping them together, often resulting in a Typical 5 Day Bro Split. Again, this is totally fine as it shows that the Beginner understands that it’s better to perform certain Exercises for specific Body Parts in Succession during one Workout, and other Exercises for other Body Parts during a Workout later in the Week.
In the meantime the Beginner should slowly start to focus on their Nutrition, make sure they get Adequate Protein, Healthy Fats & Micro-Nutrients from their Diet to provide Recovery from the Workouts, while Carbs can slowly be increased to increase Energy Levels in the Gym and slowly progress up in Weight on each of the 4 Sets Performed for each Exercise in their Budget.
This is the Fastest Way to learn your own Body & Auto-Regulation!
Training Intuitively by Feel
Enthusiastic Beginners that like a Challenge and want to improve their Shape & Athletic Performance, will Max out on a Full Body Routine within a Year and progress into an Upper/Lower or Push-Pull-Legs Routine, Focusing on Progressive Overload. They will then follow a PPL Routine for Several Years until they can no longer make noticeable Progress as they’re not recovering with their Limited Hormone Production, even though Calories are as high as they can Stomach them!
Once you’re able to go by Feel, you don’t really need an Exercise Budget anymore. You should already have a Fundamental Understanding of how to Perform the Majority of the 30 Exercises mention above, as well as every other Exercise you can do at your Gym. This means a Mental Portfolio of 50 Exercise or more, which allows you to Select Exercises as you go Along.
As you Train one Body Part, another might get Stimulated and Primed for another Exercise. Based on your Level of Soreness & Energy Levels of that Particular Body Part, you can Pick & Chose a Corresponding Exercise from your Mental Portfolio or Exercise Budget List and Proceed with your Workout. At this Point you’re no Longer a Beginner, but well versed in Gym Etiquette, Exercise Execution & How your Body Responds to the Exercises you like to Perform during your Workout!
Training by Feel is perhaps the most Important Aspect of your Fitness or Body Building Journey, as even the most Planned Out Exercise Program, needs Room for Flexibility, when certain Pieces of Equipment in your Program, might be in use by other Gym Members.
In this Article I’ll describe the Foundation for ALL Workout Splits, whether that’s a Push-Pull-Legs Routine or a 6-Day Split. Progressive Overload allows you to Track your Workouts and set Goals for your next Workout. Setting Goals and Attaining them, increases your Strength in a given Rep Range, which Eventually Results in more Muscle Mass.
Progressive Overload can be Followed by Intermediate Lifters who already Completed their Full-Body & Upper / Lower Split and are ready to Switch into a Push-Pull-Legs Routine, in order to make the most Progress possible. Progressive Overload can also be Incorporated into a Multiple-Day Training Split.
Before you get started with Push-Pull-Legs or a Multiple-Day Split, it’ Important to get a Grasp on the Philosophy behind Progressive Overload and how it Benefits 99% of the Lifter with Average to Good Genetics. Exceptionally Good Genetics can train like an Absolute Donkey and still look Bigger, Leaner & Denser Naturally, then most Gym Rats on a Typical Steroid Forum Cycle!
When you Follow Progressive Overload, you Track of your Lifts with a Logbook or with Memory if you’re able to do so. Keep Track of your Accomplished Weight & Reps for each Exercise during the Workout. The next Time you Perform that Exercise, you try to either increase the Reps or the Weight, or BOTH!!
Progressing Working Weight & Reps
Personally, I prefer to Establish an Ideal & Maximum Rep Range for each Body Part and Aim to Break this Maximum Rep Range before increasing the Weight to Facilitate additional Hyper-Trophy. Let’s say for Chest the Ideal Rep Range is 6-8 Reps and the Maximum Reps are 9 or Above, in case you have an Awesome Workout and Feel really Strong that Day!
Whenever I reach 9 Solid Reps or more, meaning Reps with Continues Tension, without Resting at any Point during the Set, with Perfect Range of Motion (ROM), Perfect Form & Perfect Time Under Tension (TUT), in that Case I can Safely increase the Working Weight. This Weight increase will be an Achievable Increment, where I can Aim for 5-6 Reps, in order to stay Close to the Ideal Rep Range for Chest.
Every Following Workout I will Attempt to slowly build up the Amount of Reps I can do with that New Working Weight, until I reach 9 Solid Reps again, at which Point I will add more Weight to my Working Set and Start the Process of Progressive Overload & Forced Adaption all over again.
You only Perform Working Sets to Failure or Beyond Failure with Weights that becomes Challenging at the Bottom of the Ideal Rep Range. When the Barbell Bench Press becomes Challenging around 4-6 Reps, then you take that Set ALL the Way to Failure, which should be around 6-8 Reps in this Case. If you’re on enough PEDs & Food to Facilitate FULL Recovery before Training that Body Part again, then you can use a Spotter to help you Train Beyond Failure for Additional Hyper-Trophy. Keep in mind that you need to be able to Recover from Beyond Failure Training and shouldn’t Incorporate this Technique on all Working Sets. Ideally only on Body Parts you’re trying to Improve, to a Maximum of 3 Sets Beyond Failure per Workout!!
Honestly, not Everybody prefers to Train in a Relatively Low Rep Range of 4-8 Reps, some Prefer 8-12 and get Amazing Results that way. It’s very Important to Figure Out which Rep Ranges each Body Part Responds to for Maximum Hyper-Trophy.
Feel free to Start with 8-12 Reps per Working Sets, when you Plateau making Strength Progress, you can reduce the Rep Range to 6-10 Reps, then 6-8 Reps, and perhaps 4-6 Reps if your Recovery is 100% in Place. During this Trail & Error Period you can easily Assess which Body Parts respond well to each Specific Rep Range. Once a certain Body Part sees Significant Progress by Switching from one Rep Range to another, then you can stick with that Body Part Specific Rep Range and Maximize the Hyper-Trophy Response.
You should keep Gaining Strength, Size & Muscle Maturity until you Plateau due to Impaired Recovery Capability from Insufficient of Rest Days, Caloric or PED Intake. Until this happens and you need to make Adjustments elsewhere, you can slowly Drop Rep Ranges, which Result in very Noticeable Strength increases. Once you’ve assessed your Ideal Rep Ranges, you probably don’t want to increase them again, as Half the Weight, for Double the Reps doesn’t feel as Challenging & Rewarding as Heavy Weight for a Solid 6 Reps does!
Ideal & Maximum Rep Ranges
If you’ve already Figured out your Rep Ranges for each Respective Body Part, then you can stay with the Rep Ranges that work well for you. Otherwise you can Break the Body Parts down according to the Following Rep Ranges: • Chest, Shoulders, Back, Hamstrings & Glutes; 6-10 Reps • Biceps, Triceps, Adductors; 8-12 Reps • Quads, Calves & Abs; 10-15 Reps
Adjustments & Variations for Additional Progress
You can Continuously Lower your Rep Ranges for every Exercise you Perform during your Workout, even Lower than your Ideal Rep Range for Hyper-Trophy, in order to Facilitate more Strength Gains, until you reach a Plateau. At that Point you have to make an Adjustment in order to Progress further. Adjustments can be made in many Different Aspects of your Body Building: • Change the Workout Routine • Change the Exercise Selection • Adjust Food Intake with 10% Caloric increase • Add an Extra Rest Day • Take a Full Deload or Active Recovery Week • Adjust PED Intake
Sometimes the Adjustment can be as Simple as Changing a Barbell Bench Press for a Dumbbell Bench Press. It’s very hard to Predict which Adjustment you need to make in order to Progress. You can use this Simple Checklist to see which Body Building Aspect you need to make an Adjustment: • Not Progressing the Entire Workout but other Workouts are Improving? Change the Workout Routine! • Not Progressing 1 Exercise but other Exercises are Improving? Change the Exercise Selection! • Not Progressing on All Workouts and Slowly Recomping? Adjust Food Intake with 10% Caloric increase! • Lingering Soreness due to Exercise Overlap? Add an Extra Rest Day! • Not Progressing on All Workouts with Altered Sleep Patterns or Symptoms of Over-Training? Take a Full Deload or Active Recovery Week! • Not Progressing on All Workouts and Gaining Body Fat from Caloric Increase? Adjust PED Intake!
More often than not you’ll need to make a Combination of Adjustments, which might be Hard for Intermediate Lifters to make Correctly. You can always make Single Adjustments on a Week to Week Basis until you Continue making Progress. Which is most likely due to the Combination of Beneficial Effects you’ll get for Several Adjustments made in the Weeks prior to Progressing again!
In the Beginning of Following a Push-Pull-Legs Routine this might be Relatively Easy, especially if you came from a Full-Body or Upper / Lower Routine Previously. The added Recovery you get from Spacing Body Parts apart with Several Days is more than enough to make Progress every Single Workout. However, the Longer your Follow a Push-Pull-Legs Routine, the Harder it is to make Consistent Progress with Regards to Progressive Overload. Due to Overlap of Exercises, Moving Insanely Heavy Weight which Requires more & more Calories and perhaps PEDs to Facilitate Recovery as well as Chronic Micro-Injuries, which Detract from Maximum Training Intensity to Progress beyond certain Training Plateaus.
Once you’re reached a Complete Plateau and can’t make any more Progress on the A/B PPL Split, while training 2 Days ON, 1 Day OFF, 1 Day ON & 1 Day OFF, which can take YEARS, it’s better to Transition into a 4, 5 or 6-Day Split.
You should be able to Develop the Majority of your Strength, Size, Density, Thickness and Muscle Maturity with a Push-Pull-Legs (A/B) Routine. When this Foundation has been Laid & Solidified, a Multiple-Day Split allows you to Train with more Volume and Focus on Refining your Physique, more so compared to what’s Possible with a Push-Pull-Legs Routine.
Intensity Techniques
As long as Recovery is 100% in Place, meaning that Rest Days are Scheduled Perfectly, you’re Eating in a Solid Caloric Surplus and PEDs are Sufficient to Optimize Recovery further, then you can Incorporate a few Intensity Techniques.
Personally, I only use these Techniques when I have at least 2 Rest Days per Week and a Scheduled Deload every 6-8 Weeks, I’m Consuming over 4,000 Calories every Day and I’m using at least 500mg AAS per Week, with 2iu GH per Day and Insulin a few Days per Week, to help with Nutrient Delivery. In this Scenario my Recovery is Completely Optimized and I use some of the Techniques mentioned below.
Continues Tension, Explode & Control
Every Rep of Every Exercise should be Performed with an Explosive Positive and Controlled Negative. The Concentric Portion of the Rep can be as Short as 1 Second, although during Later Stages of the Set the Concentric Portion might take 5 Seconds as you Push to Failure & Beyond. The Eccentric Portion of the Rep can be between 2-8 Seconds, depending on the Exercise, your Ability to Control the Weight, the Strength Curve and use of Resistance Bands.
Weight should always Remain in Continues Motion with Consistent & Constant Tension on the Target Muscle, without Resting at any Portion during the Set, Reps should have Perfect Range of Motion (ROM), Perfect Form & Perfect Time Under Tension (TUT). Perfect Execution for Complete Muscular Development!
No matter what Training Program you Follow, a 1 Second Exploding Positive followed by a 2-8 Second Negative, without Resting, meaning all Reps are performed Consecutively, Works for 99% of the Body Builders & Fitness Enthusiasts. It induces a Meditative State of Training that feels incredibly Rewarding when you put the Weight down, and Blood Rushes into the Muscle after it’s been Occluded throughout the Duration of the Set. Those of you who Train like this for Years know exactly how that Feels like!
Resistance Bands
You can add these to Virtually anything and add Progressive Resistance or Reverse Resistance to your Exercise. Bands come in many Different Colors & Sizes, each with their own Maximum Poundage when Stretched under Full Tension. When you use Resistance Bands, you don’t add the Maximum Poundage of each Resistance Band to your Weight Total on the Exercise. There’s no way to Quantify the Additional Load as it’s Progressive Resistance, which Changes throughout the Movement of the Exercise.
Especially when you use a Resistance Band for Reversed Resistance, which takes Load from the Bottom Portion of the Exercise and Restores Load throughout the Movement of the Exercise, without increasing Load Directly like seen with Conventional use of a Resistance Band. Reverse Banded Exercises are Particularly useful for Pushing Movements, including; Bench Press, Dips, Overhead Press, Leg Press or Hack Squats. In these Cases the Resistance Band helps to take Pressure from the Bottom of the Movement, where Tendons & Ligaments are Stretched the Most under Tension. By Removing Load at the most “Compromising” Part of each Rep, Joint Injuries can be Prevented. It also allows for a more Explosive Contraction as Load is Restored throughout the Concentric Portion of the Rep. As long as the Resistance Band was Selected to Compliment the Strength Curve of the Exercise, the Restoration of Load will Feel exactly like a PERFECT Spot from your Workout Partner, Effectively Rendering them Obsolete…
When you have Several Colored Bands to choose from, Logging the Color of the Band instead of its Respective Maximum Load under Full Tension, is the best way to keep Track of Progression. When you Incorporate Resistance Bands, either Conventional or Reverse Banded, you’ll Notice that certain Exercises Require Thicker Resistance Bands compared to others. As you Progress in Working Weight, you Stick with the same Colored Resistance Band that Compliments that Exercises particular Strength Curve. Since the Strength Curve doesn’t change, Regardless of Weight used during your Working Sets, once you Logged the Color of the Resistance Band, you keep using the same Band with that Exercise until it Breaks!
TripleRest-Pause Technique
Instead of taking 3 Sets to Failure per Exercise, while Pyramiding the Weight Up each Set, resulting in the Rep-Ranges to go Down with each Consecutive Set. Rest-Pause Technique allows the Central Nervous System (CNS) to Recover in between Consecutive Sets to Failure, using the Same Weight throughout the Performance of a Single Exercise per Body Part.
The Goal is to increase Workload with the same Weight, by Extending the Set with the Rest-Pause Technique, which results in more Reps over the Course of the Entire Set. For Example; 140kg / 315lbs Flat Barbell Bench Press x 8 Reps to Failure, then take 15 Deep Breaths after Racking the Weight. This should give you around 20-25 Seconds of Rest for CNS Recovery. Unrack the Weight and take the 2nd Set to Failure again, you should be able to get around Half the Amount of Reps you got on your First Set or 4 Reps with 140kg / 315lbs. Rack the Weight, take 15 Deep Breaths, Unrack and take the 3rd Set to Failure on your Final Rest-Pause Set, which should Result in another 2 Reps.
Instead of getting 8 Reps with 140kg / 315lbs on Flat Barbell Bench Press, you’ve now Performed 8+4+2= 14 Reps with 140kg/ 315lbs, close to Double the Hyper-Trophy Stimulus compared to a Conventional Set to Failure.
Before Implementing the Triple Rest-Pause Technique, follow a few Training Rotations with Straight Sets First, then incorporate a Double Rest-Pause Technique on a few Training Rotations, before adding a Triple Rest-Pause Technique a few Weeks later. This gives your CNS some Time to adapt and allows you to improve Recovery Capacity by increasing Rest Days, Calories or PED Intake accordingly!!
SPECIAL NOTE: In order to Perform the Rest-Pause Technique, Calories need to be at an All-Time High. You can’t do these Intensifiers on a Ketogenic Diet as you start to Burn Muscle-Protein for Energy, Dietary & Body Fat Supplies are not able to Feed the Energy Demand as Intra-Muscular Triglyceride Stores are generally Depleted, even in a Caloric Surplus on a Ketogenic Diet. You need to follow a Carb-Cycling Approach based on Activity Levels, High Carbs on Workout Days and Medium Carbs on Rest Days, no Low Carbs unless Deloading!
Widow Maker Sets
In some Exercises, like Free-Weight Squats or any kind of Heavy Dumbbell Presses, the Double or Triple Rest-Pause Technique is hard to Perform, as you constantly have to get the Weights into Position. For these Kinds of Exercises a Single Set to Failure is Performed, followed by a Widow Maker Set. This Set is a Weight Increment Lower, say your Working Weight on Squats is 140kg / 315lbs x 8 Reps, then you drop to 100kg / 225lbs and perform a 20 Rep Set. This is not a Conventional Drop Set; both the Working Set and Widow Make Set are Separate Sets that allow for Adequate Time of Recovery in between.
You can Rest during the Widow Maker Set, in order to Catch your Breath, but you’re not allowed to Rack the Weight and you will stay Under Tension when you need a Couple Breaths to Perform a few more Reps in your Widow Maker Set. It’s called a Widow Maker Set because the intent is to Kill Yourself with the Heaviest Weight Possible for 20 Reps, your Workout Partner would then Inform your Wife Post-Workout that you Died Squatting in the Gym.
20 Rep Widow Maker Sets should be used Sparingly, maybe 2 Widow Maker Sets per Week. Definitely not every Workout and certainly not each Body Part! Personally, I don’t do Widow Makers anymore because they severely increased my CPK & Creatinine Levels, meaning I was burning mostly Protein in the Later Stages of the Set.
SPECIAL NOTE: You need an AMAZING Blood Oxygen Carrying Capacity as well as Exercise VO2 Max for Widow Maker Sets, they will Suck the Wind out of you. If you’re not Athletic and don’t do any Medium Intensity Cardio on a Daily Basis, incorporate that First! Make sure you can Sustain Medium-High Intensity Cardio for at least 10 Minutes before attempting a Widow Maker Set. OTC Pre-Workouts, 300-400mg Ubiquinol, 2-5 Puffs Ventolin (Salbutamol), Offseason Anabolics that increase RBC Count & Hematocrit, Electrolytes, Cialis, Insulin, EPO, AmpK, basically anything that Actually increases Performance, are very Beneficial for Widow Maker Sets.
Drop Sets
Drop Sets are Probably the most Common and “Easiest” Intensity Techniques that People utilize during the Workout. While some say it Contributes to Metabolic Stress & Fatigue, which forces Adaptation. Others say it Extends Time under Tension, which Results in Additional Hyper-Trophy. I’ve heard everything between; Drop Sets Burn more Fat, Drop Sets increase VO2 Max, Drop Sets improve Strength, Drop Sets are the Cure to Cancer…
Personally, I don’t really believe in Drop Sets, even though I occasionally Catch myself doing a Drop Set after a Heavy Working Set, where I Failed to meet my Target Reps. It’s almost Punishment for Failing during the Working Set.
In this Case I drop Weight to about 50-60% of the Working Weight and Attempt to Match or Best the Target Reps I was intending to get during the Working Set! Drop Sets are easiest to do on Cable Machines later in the Workout, as you need Minimal Time in order to Drop the Weight, which keeps Time under Tension somewhat intact!
Training Beyond Failure
If you want to Train Beyond Failure Correctly, you’ll need a Reliable Spotter that knows how you Fail on each Exercise. Your Workout Partner is probably the most Reliable Spotter you have Access too, but your Spotter could also be your Relationship Partner that Follows the Fitness Life Style. The Bottom Line is that you need a Spotter that you can Trust and Motivates you do get those last few Extra Reps Beyond Failure in for Maximum Hyper-Trophy.
NEVER EVER ask a Random Guy in the gym to help you Train Beyond Failure and give you a Spot!! This is Begging to get your Set Ruined by an Inexperienced Lifter, or worse, Result in Injury!!
Ask a Reliable & Trustworthy Body Builder that knows how you Train, knows how much Assistance you need with each Rep Beyond Failure and knows how to Motivate you with the right Words, Grunts or whatever Mental Que you need to get the Weight Up without them Assisting you.
I often ask my Wife to just stand next to me within Eye Sight when I go for my Maximum Effort Set. Her Presence alone gives me 2 Extra Reps and she’s always ready to Assist me with another 2-3 Reps Beyond Failure with a Perfect Spot each and every Single Time!
If you don’t have your Favorite Spotter on Standby, use Reverse Resistance Bands and they Provide Adequate Support along the Strength Curve, allowing you to Train Beyond Failure as well!
Structuring a Deload
In order to Prevent Reaching an Over-Trained State or even Break through a Strength Plateau when Progress Stall, you can Schedule a Deload Week every 6-8 Weeks, either by Training at 50% Intensity or by taking a Full Week Off from Training altogether.
If you chose to Train at 50% Intensity, you Follow your usual Training Program, but don’t take Sets close to Failure. You either Train with 50% of your usual Working Weight, for the same Amount of Reps, or Train with your usual Working Weight, but with Half the Number of Reps. Both Methods of Deloading Method allows for Sufficient Protein Synthesis, in order to Aid in Recovery of “Over-Trained” Muscle Tissue, but doesn’t send a Significant Signal of Hyper-Trophy, which prevents you from Recovering from this Over-Trained State.
Let’s say you Train Chest and you usually Start with Incline Dumbbell Press; the Warmups and the Feel Sets leading into your Working Set are done the same as before: 10kg / 25lbs x 20 Reps for 3 Sets, 20kg / 45lbs x 6 Reps, 27.5kg / 60lbs x 6 Reps, 35kg / 75lbs x 6 Reps, 42.5kg / 90lbs x 6 Reps and Finally your “Working Set” of 50kg / 110lbs x 3 Reps instead of the usual 6 Reps. Then move on to Incline Dumbbell Flyes: 15kg / 35lbs x 6 Reps, 20kg / 45lbs x 6 Reps, 25kg / 55lbs x 6 Reps and Finally your “Working Set” of 30kg / 65lbs x 3 Reps instead of the usual 6 Reps.
If you work in the 8-12 Rep Range you can aim for 4-6 Reps on your usual Working Weight. You simply don’t Train to Failure when Deloading, but you can still use the same Weights you always use, just for Half the Reps!
The aim is to Maintain the same Level of Strength, without causing a Hyper-Trophy Response that Requires a lot of Protein & Nutrients in order to Recover the Muscle Afterwards.
Alternatively, you can Reduce the Working Weight with 50% and Perform the same Amount of Reps you normally would, with your Previously Attained Working Weight the Week before. Instead of 50kg / 110lbs Incline Dumbbell Press x 3 Reps, you use 25kg / 55lbs x 6 Reps and instead of 30kg / 65lbs Incline Dumbbell Flyes x 3 Reps, you use 15kg / 35lbs x 6 Reps.
However, this Method doesn’t Maintain the same Level of Strength, but is sometimes Required to Preserve Blood Flow to the Target Muscles during a Deload Week, while Minimizing the Hyper-Trophy Response for Full Recovery!
During this Time you remove Cardio altogether, or Limit Cardio to very Low Intensity, much Lower then you Normally Perform! I think you’re better off doing House Chores like Laundry, Dishes & Cleaning compared to actual Cardio on a Treadmill, Stationary Bike or Elliptical Machine. Cleaning is pretty Low Intensity and helps to keep your Mind Off wanting to Train Insane!
Personally, I just take a Complete Week Off from Training, in order to Focus my Effort elsewhere. This gives me a Mental Break from Constantly trying to Attain Lifting Goals, Training To & Beyond Failure Regularly and allows my Body to Heal all the Minor Injuries you’ve Collected by Training 100% HARDCORE for Weeks on end. It also gives my Central Nervous System (CNS) a Complete Break from Failure Beyond Training and allows several Blood Work Markers to decrease as well.
After a Complete Week Off from Training, it’s also the Perfect Time to do Blood Work. The Body slowly Saturates with Training-Related Metabolic Waste Products, over Time several Markers slowly increase; Creatinine, Creatine Phosphate Kinase (CPK) & Liver Enzymes (ALT & AST). These Markers increase due to Incredibly Intense Workouts, Performed Several Times per Week, Week in, Week Out, until it’s Time to Deload!
You should feel Refreshed, Rested & Motivated AF to get back into the Gym again after a Complete Deload, while Noticing Minimal Strength Loss if that at all, often easily Beating Previous Strength & Rep Plateaus!
Recovery is Crucial with Progressive Overload and a Week of Complete Rest is a well-deserved Break from all the Brutality you Inflict upon your Muscles!
Symptoms of Over-Trained States
Besides Strength Plateau’s, there’s several other Factors which could Indicate an Over-Trained State. The most Common Que is Irritability, even though you’re not in a Chronic Caloric Deficit or using Harsh Androgenic Compounds like Trenbolone. You’re a bit more Snappy & Irritable then usual, because your Body is Tired and you need a few Days or Complete Week of Rest in order to Replenish your Energy Levels, Catch Up on Recovery and Restore your Mood afterwards.
Another Clear Sign is Altered Sleeping Patterns, which is usually Related to Chronically Elevated Cortisol Levels. Cortisol plays a Regulatory Role in the Circadian Rhythm, which Controls Sleeping Patterns. When your Laying Awake at Night, but need to take 1 or 2 Naps during the Day, it’s obvious that you need a Deload to Restore Cortisol Levels to Normal Parameters, which allows for Deep Sleep at Night and perhaps a 10 Minute Power Nap during the Day.
In more Cases then not, Naps aren’t Required anymore after 3-4 Days of Complete Rest and Sleep Patterns should be Completely Restored. You still Finish the Deload as Planned, to pass through a few Days & Nights according to your Circadian Rhythm and keep Cortisol Levels at the Bottom of the Reference Range, before you Crank up the Intensity for the next 6-8 Weeks.
Accrual of Micro-Injuries is another Sign, although a Complete Week of Rest might not be enough to Fully Recover these Injuries. Often you need to Revise your Entire Workout Program in order to Train around the Injury, or take Several Weeks of Complete Rest with an Active Recovery PED Protocol in order to Heal fully!
The Blood Work Markers below will give any Body Builder or Fitness Enthusiast an Accurate Indication of their Current State of Health and Insight into Areas (or Organs) they need to focus their attention on, in order to Improve certain Health Markers.
Blood Work Analysis
I always ask new Coaching Clients to do Extensive Blood Work prior to Starting our Coaching Relationship so I can see where their Health Problems are (if any) and what we need to Pay Attention to while we aim to reach their goals. I always strive to keep my Clients as Healthy as Possible, often improving their Health while Attaining their Goals!
Personalized Blood Work Review & Health Advice is also available during a Consultation with Coach Steve!
Contest Prep is obviously a bit more “Abusive” when it comes to PED use as the Client is in a Caloric Deficit for a Prolonged Period of Time and might not have the Genetics to Preserve Strength & Muscle Tissue when Dieting down to Single Digit Body Fat Levels. Needless to say, we try to make sure we do the least amount of Damage Possible, but Contest Prep isn’t exactly about Health, it’s about Winning the Show!
With a Class Win, Overall and perhaps Pro Card or National, European, Asian or World Championship Title on the Line, we do tend to go “ALL IN” and Focus on Recovery of Health after the Show is done (and hopefully; WON!)
Besides the Extensive List Below, Additional Markers might be Advisable as a follow-up; Analysis of Specific Vitamins & Minerals, Analysis of Virals or Toxins as well as Organ-Specific EKG, ECG or Ultrasound if needed. In cases of presumed Kidney Impairment; a 24 Hour Urine Collection Test, with perhaps an Inulin Clearance Test, to assess Glomerular filtration rate (GFR) might be Required
Ideally, you want to do a FULL Health Checkup every 6 Months, with Monthly or Bi-Monthly Updates of Specific Markers until they are in a Healthy Range again.
General Body Details
• Age; years • Height; cm or feet & inch • Blood Pressure; Systolic (mm Hg) over Diastolic (mm Hg) • Body Weight; kg or lb • Body Fat Level; % • Waist Circumference; cm or inch
Complete Blood Count
• Hematocrit; % • Red Blood Cell (RBC) Count; Mcells/mm^3 • Red Blood Cell Distribution Width (RDW); % • Red Blood Cell Morphology • Anisocytosis; present? • Micro- & Macrocytes; present? • Hypochromia; present? • Platelet Count: Cells/mm^3 • Platelet from Smear; adequate? • Hemoglobin; g/dL or mmol/L • Mean Corpuscular Volume (MCV); μm3 or fL • Mean Corpuscular Hemoglobin (MCH); pg/cell or fmol/cell • Mean Corpuscular Hemoglobin Concentration (MCHC); g/dL or mmol/L • White Blood Cell (WBC) Count; Cells/mm^3
• Serum Iron; μg/dL or μmol/L • Total Iron Binding Capacity (TIBC); μg/dL or μmol/L • Serum Ferritin; ng/mL or nmol/L • Transferrin; mg/dL or mmol/L • Transferrin Saturation; % • Hemoglobin A1C; %
Blood Chemistry
• Total Cholesterol; mg/dL or mmol/L • Triglycerides; mg/dL or mmol/L • High Density Lipoprotein (HDL); mg/dL or mmol/L • Low Density Lipoprotein (LDL); mg/dL or mmol/L • High Sensitivity; C-Reactive Protein (hs;CRP); mg/L or nmol/L • Fasted Blood Sugar; mg/dL or mmol/L
Kidney Function
• Blood Urea Nitrogen (BUN); mg/dL or mmol/L • Creatinine; mg/dL or μmol/L • Creatine Phosphate Kinase (CPK); U/L or μkat/L • Cystatin-C; mg/L or nmol/L • Uric Acid; mg/dL or μmol/L • eGFR; mL/min per 1.73 m2
Serum Electrolytes
• Sodium (Na+); mEq/L or mmol/L • Potassium (K+); mEq/L or mmol/L • Chloride (Cl-); mEq/L or mmol/L • BiCarbonate (HCO3 / CO2); mEq/L or mmol/L • Magnesium (Mg+); mEq/L or mmol/L • Calcium (Ca+); mEq/L or mmol/L
Liver Function
• Total Protein; g/dL • Albumin; g/dL • Globulin; g/dL • Albumin:Globulin Ratio; calculated • Alkaline Phosphate; U/L or μkat/L • Total Bilirubin; mg/dL or μmol/L • Direct Bilirubin; mg/dL or μmol/L • Serum Glutamic-Oxaloacetic Transaminase (SGOT/AST); U/L or μkat/L • Serum Glutamic-Pyruvic Transaminase (SGPT/ALT); U/L or μkat/L • Gamma-Glutamyl Transferase (Gamma-GT); U/L or μkat/L
There’s about 8 Months between the Comparisons above, consisting of 4 Months Offseason without PEDs (Drug-Free), followed by a 4 Month First Cycle. I was 26 Years Old at the Time I started my First Cycle and had been Performance Enhancing Drug-Free since starting Fitness / Body Building at 15 Years Old!
During the 1st Month of the Cycle I slowly increased Food Intake from 4,500 to 5,200 Calories per Day. After I reached 92kg I started Recomping Unintentionally and slowly reduced Food Intake to 2,400 Calories per Day, while doing Double 1 Hour Cardio Sessions every Day in order to get “Shredded”! Obviously I went Tanning a lot while I was Dieting, hence the change in Complexion!
My First Cycle Consisted of 250mg Aburaihan Pharma Testosterone Enanthate per Week, for about 12 Weeks. Followed by 2 Weeks of 50mg Testolic Testosterone Propionate & 50mg Desma / Zambon Winstrol Depot per Day. During the entire Cycle I used 0.5mg UGL Arimidex Twice per Week on Injection Days. The last 8 Weeks I used between 40-120mcg UGL Clenbuterol per Day, while keeping Beta-2 Receptors Sensitive with 1mg Zaditen Ketotifen before Bed.
Watch or Listen to this Articles YouTube Video
First Cycle Prerequisites & Considerations
Since everybody and their Mother are on a Boatload of Anabolics nowadays, usually way earlier then they should be, let me break it down for you Nice & Easy and tell you when you’re actually ready to do YOUR First Cycle: 1. When you’re able to Cook ALL your own meals and NEVER miss a Meal! 2. When you’ve done Progressive Overload to the point you’re Anxious and Scared before the next Workouts. 3. When you know how to Schedule a Deload, before Over-Training occurs. 4. When you’ve been keeping track of your Blood Work and your Testosterone is declining, even though you’ve done everything in your Power to keep it as high as naturally possible, through Nutrition, Supplementation, Circadian Sleep Cycles, Stress Reduction & 2x Body Weight Squats for Reps. 5. When your Body Fat Levels are below 12%, any Higher will Result in Excessive Aromatase Activity and lead to High Serum Estrogen Levels, which needs Large Dosages of Aromatase Inhibitors or SERMs to Correct. 6. When a 100kg / 225lbs+ Bodybuilder on Steroids asks you what your Cycle is.
First Cycle Checklist
When you can YES to ALL 5 Points above, you have the Approval to start a Cycle. Before you get started, a simple Checklist: 1. You understand you are making a LIFE-TIME Commitment to Steroid Use. Nobody ever does one Cycle and walks away, the large majority of us Blast & Cruise and only come off to get their Wife or Girlfriend Pregnant. You should still go through at least 1 PCT before Blasting & Cruising, this Mentally Prepares you for the Roller Coaster to come when you’re ready to Conceive! 2. You are Financially Secure and/or have Health Insurance and can pay your own Medical Expenses in case something goes wrong! 3. You understand and agree to the Legal Ramifications that come along with PED use. 4. Blood Work; ALL Markers need to be in range, if your lipids are off, steroids are certainly going to make them worse. If you’re not in a PERFECT State of Health prior to starting your Cycle, don’t expect to make any significant improvements while using Steroids and other PEDs! 5. You have your entire planned Cycle & PCT Requirements in Stock; Testosterone, Aromasin, HCG, Nolvadex, Clomid, Syringes, 21G & 27-29G x 1.5″ Needles, Alcohol Swabs should all be in your Medicine Cabinet in the qualities needed for the intended duration of your cycle. 6. You are absolutely 100% sure your PEDs are QUALITY. Meaning no Shit Underdosed UGL or faked Pharmgrade Products. Spend the money on Real Pharmgrade if you have access to it, it’s ALWAYS worth the extra cash, ALWAYS! At least make sure your UGL is produced with ORGANIC Carrier Oils! 7. You have Complete Understanding of the possible Side-Effects that come along with each and every single PED you intend to use and know how to control them before they become Incredibly Problematic! 8. You will at all Times, Control your Anger and Frustration with the World. ROIDRAGE is very real and you will forever be Bruce Banner trying to control the HULK! 9. You understand that, from your first injection on wards, you are simply renting your new Super-Body, which will slowly disappear when you discontinue using PEDs. 10. You agree that you’re now pretending to be your own Endocrinologist, Nephrologist, Cardiologist, Hematologist, Hepatologist & Nurse. Medical Professions you have limited understanding of, and are certainly not qualified in, stay humble and keep learning as most as you can!
I have read the Above Statements & Articles and Consent to a Life-Time of Health Micro-Management due to Recreational use of Performance Enhancing Drugs. I am Completely Informed of the Potential Risk and both Mentally & Emotionally Prepared of the Physiological Changes that might occur.